Tiny homes are cozy. They’re efficient. And because they’re small, they’re also moisture-sensitive.
In a conventional house, a little steam from a shower or a pot of pasta disperses through thousands of cubic feet of air and many surfaces. In a tiny home, that same steam can turn into condensation on windows, damp bedding, and eventually mold behind cabinets.
Moisture problems aren’t a character flaw. They’re physics.
This guide gives you the practical building-science tools to prevent the big three: persistent condensation, mold growth, and hidden rot and corrosion. You’ll learn how to design ventilation that actually works in a small space, how to choose materials that forgive mistakes, and how to troubleshoot if you’re already seeing signs of moisture.
Why tiny homes are uniquely prone to moisture issues
Moisture problems happen when water vapor in the air meets a surface cold enough to cause that vapor to turn into liquid water. Tiny homes amplify this dynamic in several important ways.
First, there’s the issue of high moisture per cubic foot. A single shower, a boiling kettle, or even a wet dog coming in from the rain can change the entire indoor air profile in minutes. In a larger house, those same moisture sources barely register. In your 200-square-foot home, they’re a big deal.
Then there’s thermal bridging, which is extremely common in tiny builds. Trailers with metal framing, compact wall assemblies, and structural steel all create cold spots where warm, moist interior air can meet chilly surfaces and drop its moisture as condensation.
Air sealing plays a tricky role too. Many tiny homes are either very tight or very leaky, and both extremes can cause issues if they’re not paired with controlled ventilation. A leaky home lets humid air sneak into wall cavities where it condenses on cold sheathing. A tight home traps moisture inside unless you give it a deliberate path out.
And let’s not forget that many tiny homes rely on propane appliances. Unvented combustion doesn’t just add heat—it adds water vapor, and quite a lot of it, along with other byproducts you don’t want to breathe.
A tiny home can be “tight” and still have moisture problems. Tightness is good; unmanaged tightness is the problem.
The core concepts (in plain language)
Humidity
Relative humidity, usually abbreviated as RH, tells you how “full” the air is with water vapor at a given temperature. Think of it like a sponge—warm air is a bigger sponge that can hold more water, and cold air is a smaller sponge. The comfort target for most indoor spaces falls in the 30–50% RH range. Once you climb above that, condensation risk goes up, especially in cold climates where your walls, windows, and other surfaces are cooler.
Dew point
The dew point is the temperature at which air can no longer hold all its moisture and starts dumping it as liquid water. If a surface in your home—like a single-pane window, a metal fastener, or the edge of a steel trailer frame—is at or below the dew point, you’ll get condensation on it. Understanding dew point helps you see why some spots in your home always seem wet even when the rest feels fine.
Air leakage vs ventilation
These two things sound similar, but they’re fundamentally different. Air leakage is uncontrolled air movement through cracks, gaps, and holes in your building envelope. It’s random, unpredictable, and often pushes moisture into places you can’t see. Ventilation, on the other hand, is controlled air exchange—fresh air in, stale air out, through pathways you’ve designed on purpose. The ideal approach is to build a tiny home that’s well air sealed, then add intentional ventilation so you’re the one deciding where air goes.
The two levers you control
When it comes to moisture management, you really have two levers to pull. Understanding both of them—and using them together—is the key to keeping your tiny home dry and comfortable.
Lever 1: Reduce moisture input
The first lever is about reducing how much water vapor you’re putting into the air in the first place. Showers are probably the biggest single source—a hot shower in a tiny bathroom can spike humidity to rainforest levels in minutes. Cooking is another major contributor, especially if you’re boiling water, simmering soups, or using a rice cooker. Drying clothes indoors is a surprisingly potent moisture source too; all that water has to go somewhere, and in a tiny home, “somewhere” means the air you’re breathing.
Even your own body is a humidifier. Every person exhales roughly a cup of water over the course of a night’s sleep. And if you’re using unvented propane heaters or cooktops, you’re adding water vapor from combustion on top of everything else. Being aware of these sources is the first step toward managing them.
Lever 2: Increase moisture removal
The second lever is getting that moisture out of your space. The most direct method is exhausting humid air to the outside using fans—a bathroom exhaust fan, a range hood, or both. You can also bring in drier outdoor air through balanced ventilation, which replaces moist indoor air with fresher outside air. In climates where the outdoor air itself is humid, a dehumidifier becomes an important tool. Most people need a combination of all three strategies, adjusted for their climate and season.
Design ventilation like a system (not like a wish)
Here’s where a lot of tiny home builders go wrong: they add a fan here or crack a window there and hope for the best. Effective ventilation isn’t a wish—it’s a system. It needs to be adequately sized for your space, quiet enough that you’ll actually leave it running, ducted correctly so air goes where you want it, and placed where the moisture is actually being generated.
The “minimum viable” ventilation setup
For most tiny homes, a reliable baseline includes three components. First, you want a ducted bathroom exhaust fan that vents directly to the exterior—not into an attic space, not into a wall cavity, but all the way outside. Second, a ducted range hood over your cooking area, or at the very least, a strong kitchen exhaust fan. Third, you need a plan for make-up air, which is fresh air coming in to replace what the exhaust fans are pushing out.
That last point is critical and often overlooked. If you don’t provide make-up air, your exhaust fans have to fight against the air-tightness of your home. They’ll either underperform or, worse, create enough negative pressure to backdraft combustion appliances—pulling carbon monoxide and other fumes back into your living space.
Exhaust-only vs balanced ventilation
Exhaust-only ventilation—basically just running a bath fan and range hood—is the most common approach and can work well in many situations. However, in very tightly built tiny homes, it can create significant negative pressure, which brings the backdrafting risks we just discussed.
Balanced ventilation takes a more sophisticated approach by using a device—usually an HRV or ERV—that simultaneously pushes stale air out and pulls fresh air in. An HRV (Heat Recovery Ventilator) transfers heat between the outgoing and incoming air streams, which is fantastic for cold climates because you’re not throwing away all that heat you paid for. An ERV (Energy Recovery Ventilator) transfers both heat and moisture between the streams, making it especially helpful in humid climates where you don’t want to import a bunch of outdoor humidity along with your fresh air. Balanced systems are more complex to install, but they solve a lot of tiny-home humidity headaches in one elegant package.
What about opening windows?
Opening windows absolutely helps with ventilation, and on a mild spring day, it might be all you need. But windows are inconsistent as a primary strategy. They don’t work during rainstorms, wildfire smoke events, or extreme cold and heat. They don’t run while you sleep, unless you’re comfortable leaving them open all night in every season. Treat windows as bonus ventilation—a nice supplement to your system—but never as the plan itself.
Bathrooms: the highest-leverage problem area
Shower steam is your main enemy
If you’re going to focus your moisture-control efforts anywhere, start with the bathroom. A single hot shower can spike indoor humidity dramatically, and in a tiny home, that moisture has nowhere to hide. The most important thing you can do is use a ducted fan—not a recirculating one that just blows humid air through a filter and back into the room. Turn the fan on before you start the shower to get airflow established, and let it run for 20 to 30 minutes after you’re done. That post-shower run time is crucial; most of the moisture removal happens after you’ve turned off the water.
Tiny-home shower design tips
Beyond the fan, your shower design itself matters. Use mold-resistant wall finishes like tile, fiberglass, or specially rated panels instead of standard drywall. Pay close attention to sealing corners and joints, because those are the spots where water sneaks behind surfaces and causes hidden damage. Make sure your shower enclosure actually contains the steam rather than letting it billow out into the rest of your home. And if you’re considering an unvented “wet bath” design where the entire bathroom gets wet, make sure your ventilation is robust enough to handle it—otherwise, you’re creating a moisture factory.
If your bathroom stays damp
You know you have a problem when towels never fully dry between uses, there’s a persistent musty smell, or condensation lingers on mirrors for hours after a shower. If that sounds familiar, start by upgrading your fan capacity or checking the ducting. The duct run should be as short and smooth as possible—every bend and extra foot of duct reduces airflow. If the duct passes through a cold space like an exterior wall cavity, insulate it to prevent condensation from forming inside the duct itself. A timed switch that lets the fan run automatically for a set period after you flip it off can also make a big difference, because it removes the human element of forgetting to leave it on.
Kitchens: the sneaky moisture factory
Cooking moisture adds up faster than most people realize. Boiling water for pasta, simmering a pot of soup, running a rice cooker, and even hand-washing dishes with a full drying rack all pump water vapor into your tiny home’s air. It’s sneaky because you don’t always feel it the way you feel shower steam, but a hygrometer will show you just how much cooking raises your indoor humidity.
A range hood is not optional in small spaces
If you cook with any regularity, a ducted range hood is one of the best investments you can make. It captures steam and cooking fumes right at the source, before they spread through your home. If you don’t have a ducted hood and can’t easily install one, work with what you’ve got: run your strongest exhaust fan while cooking, crack a window to provide make-up air during heavy stovetop sessions, and prefer using lids on pots and lower simmer settings to reduce the amount of steam you’re generating in the first place.
Avoid unvented propane for indoor cooking when possible
Propane combustion produces water vapor as a byproduct—roughly one cup of water for every cup of propane burned. On top of that, it can add pollutants like nitrogen dioxide to your indoor air. If you must use propane for cooking, make sure you have active exhaust running the entire time, install a quality CO alarm, and consider sealed combustion systems where feasible. Your lungs and your walls will both thank you.
Insulation, air sealing, and thermal bridges
Ventilation is only half the moisture story. The other half is about surfaces. Moisture becomes condensation when interior air meets cold surfaces, so eliminating those cold spots is just as important as managing airflow.
Thermal bridges in tiny homes
Thermal bridges are paths where heat conducts quickly through your building envelope, creating cold spots on interior surfaces. In tiny homes, the most common culprits are the trailer frame and other metal structural members, window frames (especially aluminum ones), fasteners that connect the inside finish to the outside sheathing, and corners or roof-to-wall junctions where insulation is thin or compressed. These cold spots become condensation magnets, and over time, that condensation feeds mold growth and material decay.
Insulation strategy matters
Good insulation reduces the number and severity of cold surfaces in your home. The most effective approach is to prioritize continuous insulation wherever possible, meaning insulation that wraps around the outside of your framing rather than just filling the cavities between studs. Seal air leaks carefully, paying special attention to corners, penetrations, and transitions between different building assemblies. Use appropriate vapor control layers for your climate—what works in Minnesota is different from what works in Florida.
Because many tiny homes travel and experience different climates over their lifetime, aim for wall, floor, and roof assemblies that are forgiving. That means assemblies that can dry in at least one direction if moisture does get in, and that don’t rely on perfect installation to perform well.
Materials that help you win
Interior finishes
Your choice of interior finishes can make moisture management much easier—or much harder. In wet areas like bathrooms and kitchens, choose finishes that can tolerate occasional high humidity without growing mold. Mold-resistant drywall or moisture-rated panels are good options for walls. Tile or sealed surfaces work well in areas that get directly wet. And don’t overlook paint—kitchen and bath formulations are designed to resist moisture absorption and mold growth, and they’re a simple upgrade that makes a real difference.
Cabinet and furniture design
Hidden, stagnant spaces are where mold loves to set up shop. If you push a bookshelf or cabinet flush against an exterior wall, you create a cold, dark, still-air pocket that’s perfect for mold growth. Instead, leave small air gaps behind furniture on exterior walls to allow airflow. Avoid fully sealing storage compartments against cold corners, and make sure air can circulate under beds, especially platform beds built over storage areas. A little bit of airflow goes a long way toward preventing the conditions mold needs to thrive.
Flooring and underlayment
If moisture gets trapped under your flooring, it can create persistent musty smells and degrade your subfloor and finish materials over time. Make sure wet areas like bathrooms and kitchens have proper sealing at the floor perimeter so water can’t seep underneath. For trailer-based tiny homes, ensure there’s adequate ventilation below the home so moisture doesn’t accumulate against the underside of the floor assembly. And check your plumbing regularly—a slow, chronic leak under a floor is one of the most damaging moisture problems you can have, precisely because it’s invisible until the damage is done.
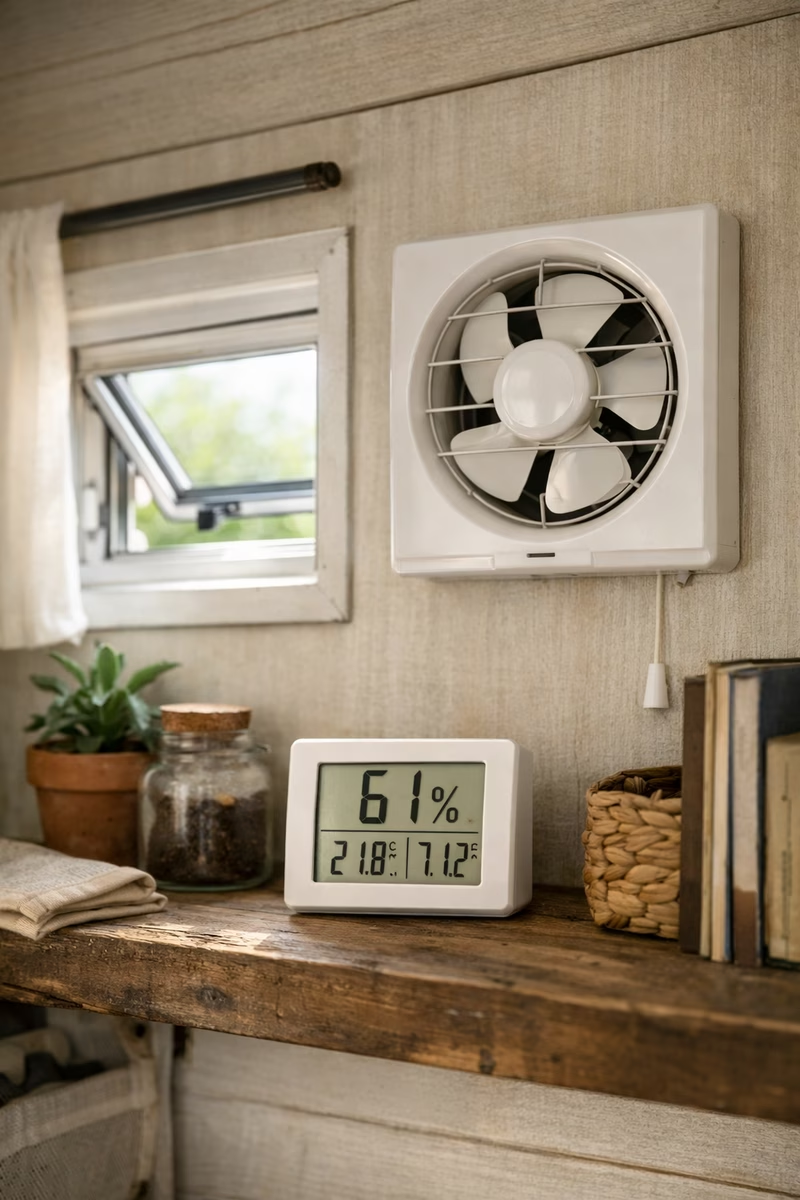
Monitoring: the easiest way to catch problems early
A small hygrometer—available for anywhere from $10 to $30—can be one of the most valuable tools you own as a tiny home dweller. Place one in your main living area so you can glance at it throughout the day. Consider a second one near the sleeping area, since nighttime humidity from breathing tends to build up more than people expect. If you want to be thorough, a third one in or near the bathroom gives you a complete picture of your home’s moisture profile.
If you routinely see readings above 60% RH, you’re in mold-friendly territory and need to take action. Even if things look and smell fine today, sustained high humidity will eventually cause problems. Think of your hygrometer as an early warning system—it tells you about moisture issues before they become mold issues.
Troubleshooting guide (symptom → likely cause → fix)
Symptom: condensation on windows every morning
Waking up to fogged or dripping windows is one of the most common moisture complaints in tiny homes. The usual culprit is high nighttime humidity—remember, you’re breathing out moisture all night long, and if someone dried laundry inside or took a late shower, that adds to the load. Cold window surfaces make the problem worse, since they’re often the coldest surface in the home and hit dew point first. Insufficient overnight ventilation means all that moisture just sits in the air with nowhere to go.
The fix is a combination approach. Run a low, continuous ventilation fan overnight rather than shutting everything off at bedtime. Reduce moisture sources in the evening—no late showers or indoor laundry drying if you can help it. And if your windows are single-pane, consider upgrading to double-pane units or adding insulated coverings, though be sure to still allow some airflow around them so you’re not just moving the condensation point to the wall behind the curtain.
Symptom: musty smell in cabinets or closets
That classic musty, earthy smell in enclosed storage areas is almost always the result of air stagnation combined with a cold surface and enough humidity to keep things damp. The air inside a closed cabinet against an exterior wall doesn’t move, the wall surface is cold, and the moisture has no way to escape.
To fix this, improve overall ventilation in the home to reduce background humidity levels. Add airflow gaps by pulling furniture away from exterior walls or drilling small ventilation holes in the backs of cabinets. Some people install small passive vents or louvered panels in cabinet doors to keep air circulating even when the doors are closed. These are small changes, but they eliminate the stagnant conditions mold needs.
Symptom: mold spots on ceiling corners
Dark spots appearing in the upper corners of your ceiling usually point to thermal bridging at the roof-to-wall junction. These corners tend to be the coldest spots in the home because insulation gets thin or compressed where the roof meets the wall. Humidity spikes from cooking and showering provide the moisture, and the cold corner provides the condensation surface.
Better exhaust habits are your first line of defense—run fans longer during and after cooking and showering. If you can access the insulation at those corners, improving it will raise the surface temperature and reduce condensation. Clean any existing mold safely with appropriate products, but remember that cleaning without addressing the root cause just means the mold will come back.
Symptom: damp bedding or mattress underside smells
If the underside of your mattress feels damp or smells funky, the problem is trapped moisture. Your body produces heat and humidity while you sleep, and that moisture migrates downward through the mattress. If the bottom of the mattress sits on a solid platform with no airflow, moisture accumulates and creates a perfect environment for mold and mildew.
The solution is straightforward: add ventilation underneath the mattress by using slats instead of a solid platform, or place a breathable underlay between the mattress and the base. Avoid pushing the bed directly against an exterior wall, where the cold surface compounds the problem. And make sure you’re running at least some ventilation overnight to keep overall humidity levels in check.
Cleaning mold safely (and when to call for help)
For small surface spots—a patch on a wall, some discoloration on a windowsill—many people successfully clean with appropriate mold-removal products and then improve their moisture control to prevent recurrence. The important thing is to address the underlying cause, not just wipe away the visible growth.
However, there are situations where you should call a professional. If mold keeps returning quickly after cleaning, that’s a sign the moisture source hasn’t been addressed. If you suspect mold is growing inside walls, under floors, or in other concealed spaces, a professional can assess the extent without causing further damage. Anyone with asthma or a compromised immune system should be especially cautious around mold remediation. And if you smell strong mustiness but can’t find the source, a professional with the right tools can track it down. The goal is never just cleaning—it’s preventing recurrence.
Seasonal strategy (because tiny homes experience extremes)
Winter (cold climates)
Winter is peak condensation season. Every surface in your home is colder, which means the dew point is easier to hit. It feels counterintuitive to ventilate when it’s freezing outside, but winter is actually when you need ventilation the most. Run your fans consistently, even if it means your heater works a little harder. Keep interior temperatures as stable as possible, since temperature swings create condensation cycles. Avoid drying laundry inside if you can—use a laundromat or an outdoor line on dry winter days. And watch your window condensation closely; it’s your earliest and most visible warning sign that indoor humidity is climbing too high.
Summer (humid climates)
Summer in a humid climate flips the script. Now the outdoor air itself is loaded with moisture, and simple ventilation can actually bring humidity in rather than pushing it out. In these conditions, air conditioning and dehumidification become your primary tools. If you’re running balanced ventilation, an ERV is preferable to an HRV because it transfers moisture as well as heat, keeping some of that outdoor humidity from entering your home. The focus shifts from air exchange to active moisture removal.
Shoulder seasons
Spring and fall are the easiest seasons for moisture management. Outdoor temperatures are mild, humidity levels are often moderate, and you can rely more heavily on natural ventilation through open windows. It’s a great time to air out the home thoroughly, dry out any areas that accumulated moisture over winter, and keep a casual eye on your hygrometer readings. Enjoy the break—the more challenging seasons will be back soon enough.
A realistic action plan
If you want to make meaningful progress on moisture control quickly, here’s a straightforward path forward. Start by buying a hygrometer and measuring your baseline relative humidity over a few days of normal living. Next, confirm that your bathroom fan is actually ducted to the exterior and that you’re using it correctly—on before the shower, running well after. Then focus on improving your kitchen exhaust behavior during cooking, whether that means using a range hood, running a fan, or at least cracking a window. After that, take a walk around your home and add airflow gaps behind any furniture sitting against exterior walls. Finally, if your humidity readings stay stubbornly high despite these changes, it’s time to consider a dehumidifier or a balanced ventilation system to bring things under control.
The takeaway
Moisture problems are not “tiny home problems.” They’re small-volume building problems, and they have well-understood solutions.
The win condition is straightforward: reduce the moisture you’re putting into the air, remove moisture with controlled ventilation, and reduce cold surfaces through good insulation and fewer thermal bridges. These three strategies work together like a team—weakening any one of them puts extra pressure on the other two.
Do those things consistently and your tiny home stays comfortable, healthy, and durable for the long term. You don’t need to be a building scientist. You just need a hygrometer, a decent exhaust fan, and the willingness to think of moisture as something you manage every day, not something you fix once and forget.