The Build Site Is a Tool
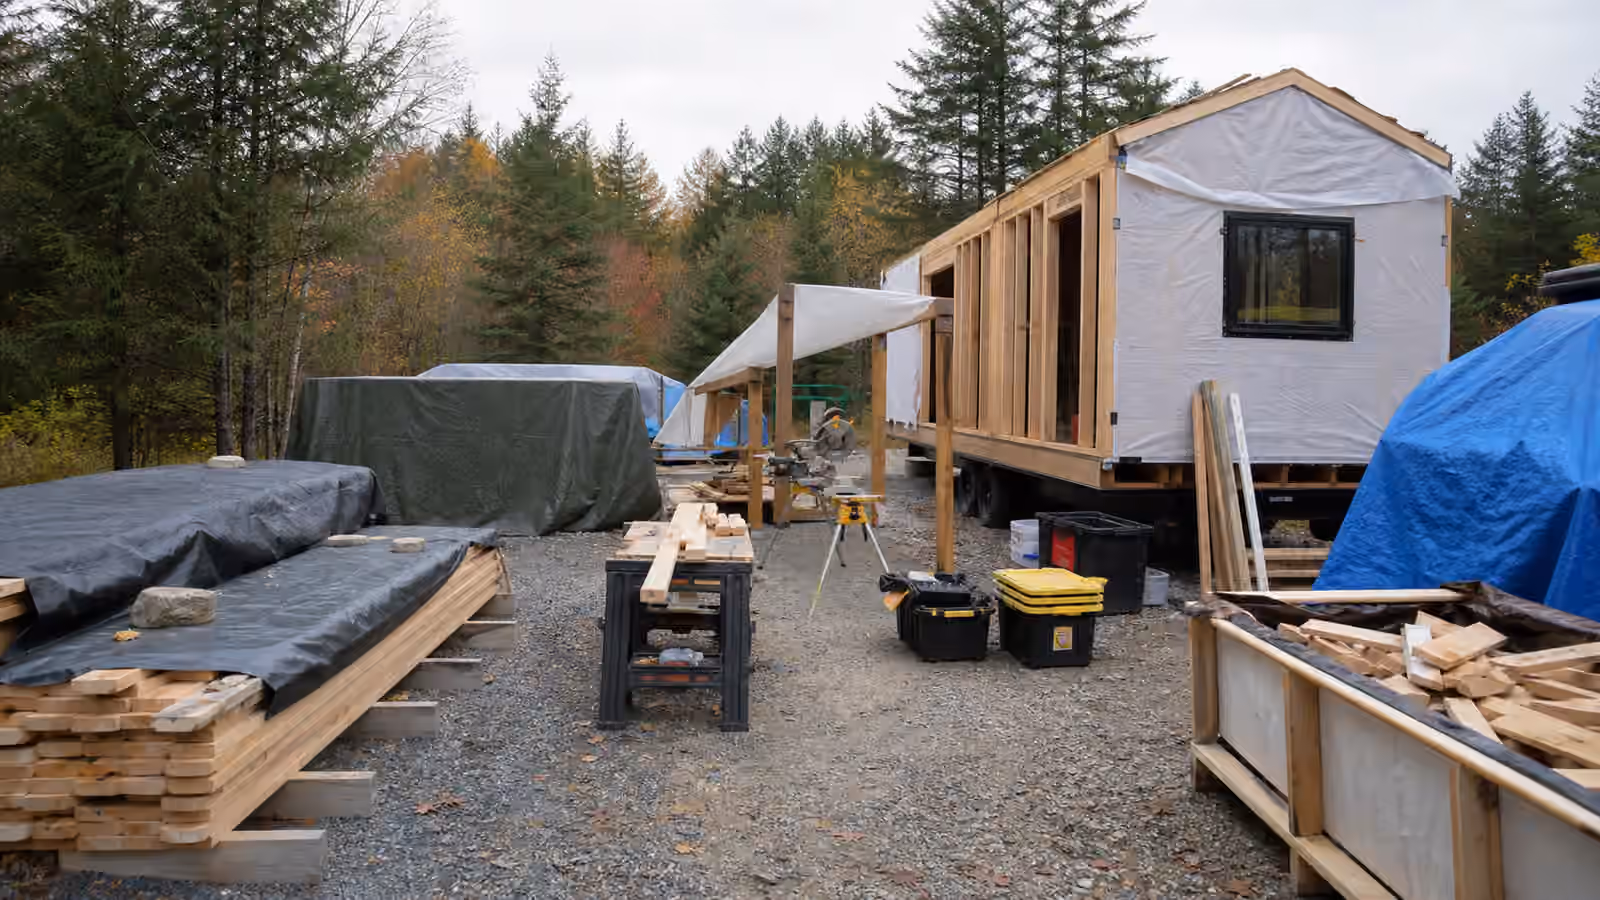
A DIY tiny home build is often described through framing details, insulation choices, windows, and finish work. Those decisions matter, but the site around the build can either support every step or quietly fight the builder for months. Lumber stacked in the wrong place gets moved three times. Sheet goods warp because they sit too close to wet ground. Tools migrate across the site because no work zone has a stable purpose. Scraps block the safest path. The tiny house may be small, but the work around it still needs room.
This guide is a companion to the Tiny Home Building Guide and Tiny Home Exterior Envelope, Siding, and Roofing . Those pages focus on what gets built. Here the focus is the temporary world that lets the build happen: material storage, cut stations, tool routines, weather cover, scrap handling, and walking paths. Good staging does not make the work glamorous. It makes the work repeatable.
The main principle is to design the build site as deliberately as the floor plan. A clean site is not just visually pleasing. It reduces lifting, protects materials, lowers the chance of mistakes, and keeps the builder from spending the best hours of a weekend searching for a driver bit under a tarp.
Store Materials Where They Will Survive
Construction materials have personalities. Framing lumber tolerates some roughness but can twist when stored badly. Plywood and sheathing dislike wet edges. Finish boards need more protection than blocking. Insulation can become useless if it gets soaked or crushed. Fasteners and tapes disappear when they are not kept in a closed, dry place. Treating all materials as one pile is the first staging mistake.
Most tiny home builds benefit from a few distinct storage zones. Long lumber should sit on sleepers, not directly on soil. Sheet goods should be supported flat enough to avoid bowing, covered against rain, and accessible without unloading the entire stack. Finish materials should wait until the building can protect them, or they should be stored somewhere drier than the work site. Small parts should live in bins that close, because wind and weather turn open trays into scavenger hunts.
Weather cover needs air as well as waterproofing. A tarp wrapped tightly around damp lumber can trap moisture. A cover that sheds rain while allowing airflow is usually more useful than a sealed bundle that sweats. Keep materials high enough that splashback and puddles cannot reach them, and check covers after wind. The most careful stack can fail if one corner of a tarp lifts during a storm.
Staging should also respect sequence. Materials needed next should be easiest to reach. Materials needed months from now should not occupy the center of the work path. When a delivery arrives, resist the urge to accept the supplier’s drop location as final. Five minutes of directing a drop can save hours of moving heavy material by hand.
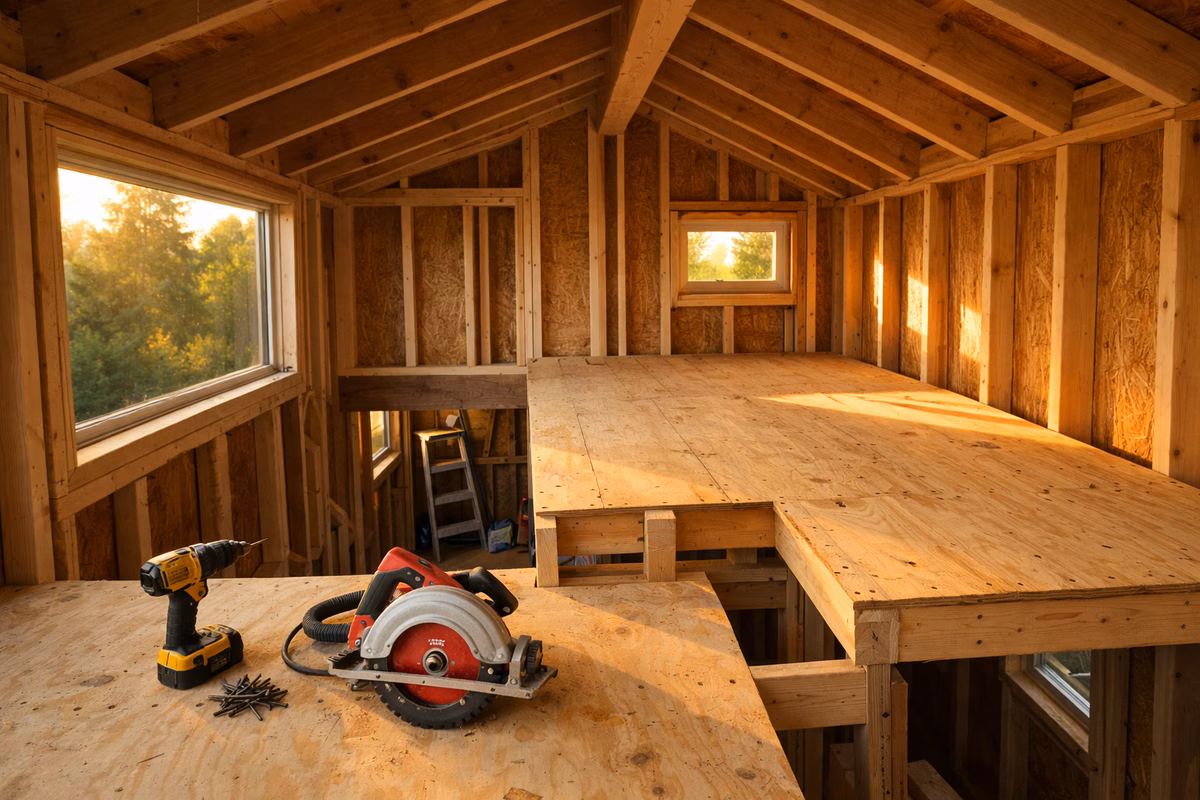
Give Cutting Its Own Place
A tiny home build creates thousands of small cuts, trims, holes, and adjustments. If there is no dedicated cut station, every flat surface becomes temporary, and the builder loses accuracy as the day goes on. A simple, stable cut area with sawhorses, support wings, power access, and a place for offcuts can change the pace of the whole project.
The cut station should be close enough to the build that pieces do not travel far, but not so close that sawdust and scraps enter the house constantly. It should have a predictable direction for long boards so the operator is not swinging material into a window opening, vehicle, or walking path. It should be level enough that measuring and cutting feel controlled. If the site is exposed, a small canopy or movable cover can keep light rain from ending every work session.
Power at the cut station deserves thought. Long extension cords across a gravel path become trip hazards and get damaged. If temporary power is part of the build, route it deliberately and protect it from wheels, water, and sharp edges. The Tiny Home Electrical Planning guide focuses on the finished house, but the temporary electrical setup also affects safety and productivity.
Accuracy improves when the cut station has a reset habit. The tape returns to the same hook. The pencil returns to the same ledge. Offcuts are sorted before they bury the saw. Blades are protected. Batteries have a charging home. None of this has to be elaborate. It just has to be consistent enough that the builder’s attention stays on the work.
Keep Paths Clear Before the House Gets Tight
During framing, the site may feel spacious because the house is still open. As walls close, windows arrive, ladders appear, siding stacks up, and interior work begins, the same site can become cramped. Clear paths should be established early, before clutter teaches everyone a worse route.
The most important paths are the route into the tiny home, the path from material storage to the cut station, the path from the cut station to the work face, and the route to waste or scrap storage. These paths should stay clear even at the end of a tired day. If a path crosses mud, loose gravel, cords, or narrow planks, the work will slow down and the chance of damage rises. Carrying a window, sheet of plywood, or cabinet through an improvised obstacle course is not a normal part of building. It is a staging failure.
Clearance matters vertically as well. Long boards need room to swing. Ladders need firm footing. Roof work needs a place for tools that is not the top rung. If the build is on a trailer, remember that the working height changes everything. Tasks that would be simple on a slab may need platforms, safe ladder angles, or temporary steps. The Tiny Home Stairs, Ladders, and Loft Access guide is about the finished interior, but the same respect for movement applies during construction.
Separate Scraps From Useful Offcuts
Tiny home builders often save every offcut because the project is small and the next blocking piece might be hidden in the pile. That instinct is understandable, but an unsorted scrap pile grows into a time sink. Useful offcuts should be different from waste. The difference is not moral. It is practical.
Keep a modest, visible place for pieces likely to be reused soon: blocking, shims, test pieces, trim samples, and short boards of known material. Keep true waste somewhere else, away from the work path and protected from spreading in the wind. Bag small plastic, tape, packaging, and insulation scraps before they migrate. Nails, screws, and sharp metal belong in a container that will not tear open. A tidy waste zone makes cleanup easier and keeps the site from feeling defeated before the house is finished.
Scrap handling also supports budget discipline. When offcuts are sorted, the builder can see what is actually available before buying more. When everything is mixed, the safe choice is often another store run. Tiny Home Budgeting applies to small purchases as much as big ones. Repeated small inefficiencies can become a real cost.
Protect Finished Work From Ongoing Work
A tiny home build changes character once finish materials begin. Early work is rough and forgiving. Later work is vulnerable. A site plan that was fine for framing can damage flooring, cabinets, siding, paint, or fixtures if it does not evolve. The staging area should shrink, move, or become cleaner as the house becomes more finished.
Do not store rough lumber against finished siding because it is convenient. Do not let wet boots turn the finished floor into the new staging area. Do not lean tools against installed cabinets when a simple rolling cart or wall hooks would keep edges safe. The smaller the home, the harder it is to separate active work from completed work, which makes habits more important.
This transition is also a good time to update tool storage. Rough framing tools may live near the cut station. Finish tools may need a cleaner box inside or under cover. Adhesives, sealants, finishes, and tapes often have temperature and cleanliness needs that deserve more care than general hardware. If a material is meant to create the finished envelope, protect it like part of the envelope before it is installed.
End Each Work Session With the Next Start in Mind
The best staging practice is the evening reset. It does not need to be long. It needs to answer one question: what will make the next work session begin without friction? Cover the stack that matters. Move the first needed material into reach. Charge batteries. Put the saw back under cover. Clear the path into the house. Close the container of fasteners. Take away the trash that will blow around overnight.
This habit matters because DIY builds often happen in fragments. A professional crew may return every morning with momentum. An owner-builder may work after a job, between family obligations, or on weather-dependent weekends. If each session begins by repairing the mess from the last one, the project feels heavier than it is.
A well-staged tiny home build is not spotless. It is legible. You can see where materials live, where cutting happens, where waste goes, and how people move. That legibility protects attention, and attention is one of the most limited resources on a DIY project. When the build site works as a tool, the tiny home gets better before the first finish board goes on.