Keyboard Layout Guide
Choosing the right keyboard size changes more than aesthetics. It changes where your hands live, how far your mouse has to travel, how many “reach” movements you do per hour, and whether you feel cramped or calm at your desk.
This guide is meant to help you pick a layout that fits your real day. Not your aspirational “I will use a numpad every day” day. Your actual day.
Understanding Keyboard Sizes
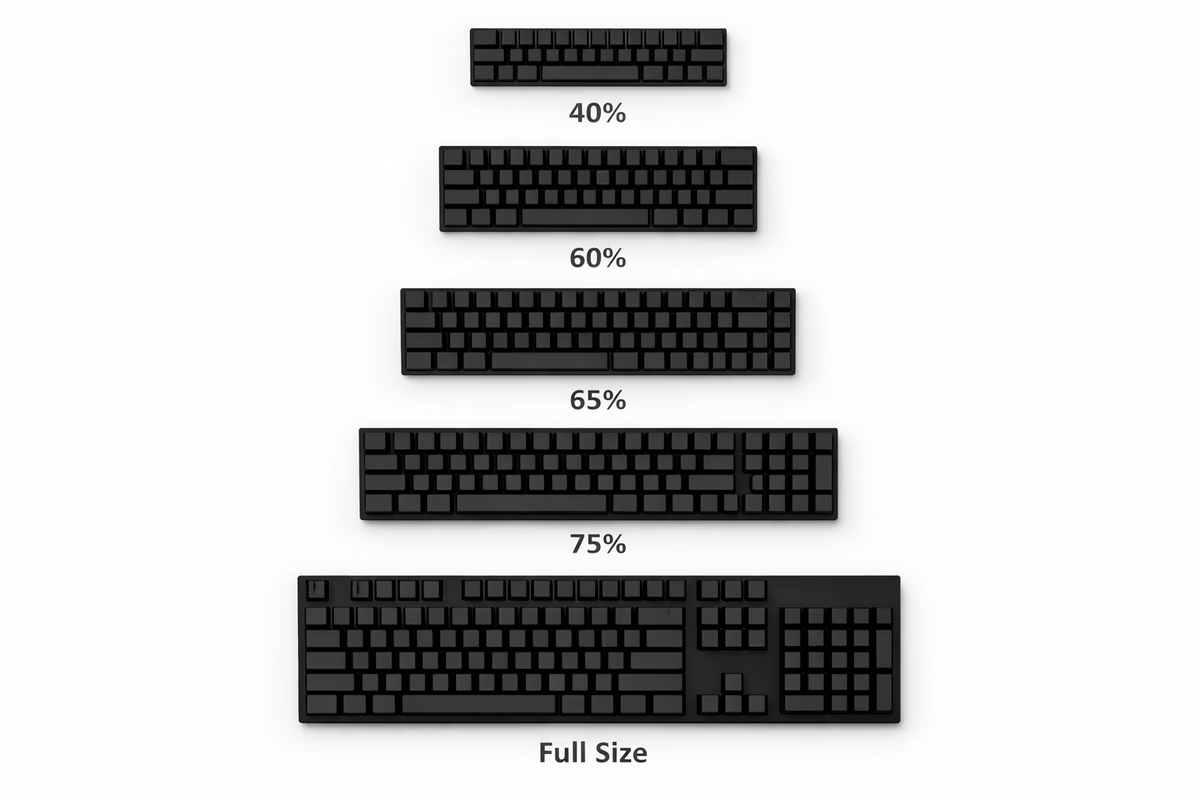
When keyboard enthusiasts throw around numbers like “60%” or “75%,” they’re talking about approximate key count compared to a full-size board, which serves as the 100% baseline. But here’s something that trips people up: “layout” isn’t just about how many keys you have — it’s about how those keys are arranged, the spacing between clusters, and the overall geometry of the board. Two keyboards can have the same number of keys and still feel wildly different to type on.
So why does size actually matter? It all comes down to ergonomics and workflow. Smaller keyboards create more room for your mouse, and that’s not just about comfort — it can genuinely reduce shoulder strain by letting you keep your arms closer together. If you’ve ever spent an eight-hour day hunched over a massive full-size board with your mouse shoved out to the right, you know exactly what I’m talking about. Compact boards are also easier to toss in a bag and tend to give your desk that clean, focused look. The trade-off? As you shrink below TKL territory, you start relying on layers — Fn key combos that let you access the keys that are no longer physically present. It sounds scary, but stick with me, because it’s way more intuitive than it seems.
If you want a “just tell me what to buy” recommendation, here it is: grab a 65% if you want compact with arrow keys, or a 75% if you want compact with arrow keys plus a function row. Both are incredibly easy to live with and won’t demand a total relearn of how you type.
Full-Size (100%) - The Traditional
Specifications
Full-size boards are the granddaddy of keyboard layouts, typically packing 104 to 108 keys (depending on whether you’re going ANSI or ISO) and stretching roughly 440mm — about 17.3 inches — wide. This is the layout you grew up with, the one sitting in every office supply catalog, and the one most people picture when someone says “keyboard.”
What You Get
With a full-size board, you get everything. A dedicated numpad for fast number entry, a full navigation cluster with Insert, Delete, Home, End, Page Up, and Page Down, dedicated arrow keys in their own little island, and utility keys like Print Screen, Scroll Lock, and Pause Break that you never think about until you suddenly need one. There are zero layers to memorize, zero combos to learn — every function has its own physical key, and that’s honestly kind of beautiful in its simplicity.
Best For
The full-size layout truly shines when the numpad is a genuine, non-negotiable part of your day. We’re talking accountants flying through spreadsheets, data entry specialists whose fingers dance across that right-hand number grid, or CAD and design professionals with workflows built around numpad shortcuts. It’s also the perfect “zero adaptation” choice — if you want a mechanical keyboard that feels instantly familiar to anyone who sits down at it, this is the one.
Drawbacks
The elephant in the room is footprint. That 440mm of keyboard real estate pushes your mouse further from your body’s centerline, and over long sessions, that extra shoulder reach adds up. If you’ve ever felt a nagging ache in your right shoulder after a marathon work session, your full-size board might be the culprit. Portability is essentially a non-starter too — these things are big, heavy, and not going in anyone’s backpack without a fight.
Popular Full-Size Keyboards
If you’re committed to the full-size life, Keychron offers excellent budget-friendly options that punch well above their price point. Ducky’s full-size boards are a solid mid-range pick with great build quality. And for the typing purists who care deeply about feel and sound, Leopold and Varmilo deliver premium experiences that’ll make every keystroke a little moment of joy.
TenKeyLess - TKL (80%) - The Balanced Choice
Specifications
Take a full-size keyboard, lop off the numpad, and you’ve got a TKL. It’s the same experience in almost every way — typically 87 to 88 keys — but at around 360mm (14.2 inches) wide, it gives you back a meaningful chunk of desk space. Think of it as the keyboard equivalent of decluttering your closet: you get rid of the thing you rarely use and suddenly everything breathes better.
What You Get
Everything that matters to most people stays put. Your arrow keys are right where you expect them, the function row stretches across the top in its familiar F1-through-F12 lineup, and the nav cluster with its Insert, Delete, Home, End, Page Up, and Page Down is intact. When you sit down at a TKL for the first time, there’s essentially no adjustment period — it just feels like a normal keyboard that went on a sensible diet.
What You Lose
Just the numpad. That’s it. If you’re someone who rarely touches those number keys on the right side of a full-size board (and honestly, most people don’t), you won’t miss it for a second.
Best For
TKL is the Swiss Army knife of keyboard layouts, and there’s a reason it’s one of the most popular choices out there. Gamers love it because pushing that mouse closer to center makes a noticeable difference in fast-paced gameplay. Programmers appreciate the extra desk real estate without losing any keys they actually use. And if this is your first mechanical keyboard, TKL is the safest possible choice — all the mechanical goodness with absolutely zero learning curve.
Why It’s Popular
The TKL hits a genuine sweet spot that’s hard to argue with. You keep the vast majority of your keyboard’s functionality, shed significant width, get noticeably better mouse ergonomics, and the transition from whatever you were using before is essentially seamless. It’s the layout that makes almost nobody unhappy, which is a rare thing in a hobby full of strong opinions.
Popular TKL Keyboards
The Royal Kludge RK87 comes in at $60-80 and is a fantastic budget entry point — honestly impressive for the money. Step up to the Keychron V3 at $80-100 and you get hot-swap sockets plus QMK/VIA programmability, which is wild value. The Ducky One 3 TKL ($120-140) is a reliable mid-range workhorse. For premium typing feel, the Leopold FC750R ($120-150) is legendary among typing enthusiasts who care about sound and consistency. And the Varmilo VA87M ($140-170) rounds out the upper tier with gorgeous aesthetics and solid build quality.
75% - The Compact Compromise
Specifications
The 75% layout takes the TKL concept and squeezes it even tighter. You’re looking at 84 to 86 keys crammed into roughly 320mm (12.6 inches) of width. Imagine taking a TKL and scooting everything closer together, eliminating the gaps between key clusters, and compressing the right side into a tighter arrangement. The result is a surprisingly full-featured board in a compact package.
What You Get
Here’s what makes the 75% so appealing: you keep your arrow keys, you keep your function row with F1 through F12, and you even hold onto most of the nav keys — Delete, Page Up, and Page Down are usually still present as dedicated keys. All of this comes in a footprint that’s noticeably smaller than a TKL. It’s like getting the apartment with the same square footage but a way better floor plan.
What’s Different
The compressed layout means keys sit closer together, especially on the right side. Some navigation keys that had their own space on a TKL get tucked onto an Fn layer instead. The right side of the board in particular can feel a bit crowded at first if you’re coming from a more spacious layout, but most people adjust within a few days.
Best For
The 75% layout is perfect for people who want the functionality of a function row and arrow keys but crave a more compact footprint. It’s ideal if you’re the type who looks at a TKL and thinks “almost, but I want it smaller.” Enthusiasts love these layouts for their unique character, and they strike a genuinely great balance between portability and having all the keys you need within reach.
Drawbacks
Let’s be honest about the compromises. The right side of a 75% board can feel cramped, especially around the Home and End cluster where keys are squeezed together. The unusual layout takes some getting used to, particularly if your muscle memory is calibrated to standard spacing. And because 75% layouts are less standardized than TKL or 60%, different manufacturers make different decisions about which keys go where — so switching between 75% boards from different brands can feel disorienting.
Popular 75% Keyboards
The Keychron V1 and Q1 ($80-180) offer excellent value across a wide price range and are fantastic entry points into the 75% world. The GMMK Pro ($170-200) targets the enthusiast crowd with a premium feel and gasket mount. For those with deeper pockets, the Mode Sonnet ($250-300) delivers a truly premium typing experience. And the Akko PC75B ($90-110) is a budget-friendly option that doesn’t cut too many corners.
Layout Variations
Not all 75% boards are created equal, and you’ll encounter a few distinct variations. The standard 75% compresses the right column tightly against the main key block. The exploded 75% adds a little breathing room with slight gaps between clusters — it’s wider but more visually balanced. And some boards skip the gap above the function row entirely for an even more compact look, though these are less common.
65% - The Enthusiast Favorite
Specifications
The 65% is where things start to get really interesting. With 67 to 68 keys and a width of about 310mm (12.2 inches), this layout is essentially a 60% keyboard that someone had the brilliant idea to add arrow keys and a small handful of nav keys back onto. It’s the layout that launched a thousand group buys, and once you understand why, it’s hard to go back.
What You Get
Dedicated arrow keys — and honestly, for most people, that’s the killer feature. You also pick up roughly four extra keys beyond what a 60% offers, typically some combination of Delete, Page Up, Page Down, and Insert, though the exact selection varies by manufacturer. The result is a board that’s compact and clean while still being eminently functional for everyday use.
What You Lose
The function row is the biggest casualty. F1 through F12 live on the Fn layer now, accessed by holding Function and pressing the corresponding number key. Most of the traditional navigation cluster is gone too. But here’s the thing: unless you’re constantly reaching for F5 to refresh or F2 to rename, you might be surprised how rarely you actually need dedicated function keys.
Best For
The 65% has earned its “enthusiast favorite” title for good reason. It’s the go-to for keyboard lovers who need arrow keys but don’t need much else beyond the essentials. Programmers adore it because arrow keys are genuinely crucial for code navigation, while the function row is easy enough to access on a layer. If you care about aesthetic minimalism but don’t want to sacrifice daily usability, the 65% threads that needle perfectly.
Why Enthusiasts Love It
There’s something almost magnetic about a well-built 65% board. The clean, compact look is objectively gorgeous — it’s the layout that makes people stop and ask “what keyboard is that?” Arrow keys being preserved means you don’t give up anything critical for daily work. The aftermarket support is phenomenal too, with virtually every keycap set, custom case, and plate option supporting the 65% layout. It genuinely sits at the sweet spot where form meets function, and that intersection is exactly where keyboard enthusiasts like to live.
Popular 65% Keyboards
The Keychron V2 and Q2 ($80-170) cover budget through mid-range beautifully. The NK65 Entry at $95 is a fan favorite — an affordable aluminum case that punches miles above its price. The Tofu65 ($140-180) has been a custom keyboard community darling for years with good reason. And the Mode Sixty-Five ($250-300) is the premium option for people who want end-game quality without the group-buy lottery.
Common Layouts
You’ll mainly encounter two flavors. The standard 65% features a right column with dedicated Delete, Page Up, and Page Down keys alongside the arrow cluster. The compact 65% uses a blocker — a small gap or blank space — instead of some right-side keys for a cleaner, more minimalist aesthetic.
60% - The Minimalist
Specifications
Welcome to the deep end. The 60% keyboard strips away everything that isn’t absolutely essential, leaving you with just 61 keys in a svelte 300mm (11.8-inch) frame. It’s alphas, number keys, and standard modifiers — nothing more, nothing less. Every other function you could possibly need lives on a layer, waiting to be summoned with a key combo.
What You Get
All your letter keys, all your number keys, and all the standard modifiers like Shift, Ctrl, Alt, and the rest of the usual suspects. The 60% is the purest expression of “keyboard” — the absolute minimum you need to type anything in any language. And that ultra-compact form factor means it takes up barely more desk space than a large book.
What You Lose
Here’s where it gets spicy. Arrow keys? Gone — they live on a layer now, typically accessible via Fn plus WASD or Fn plus IJKL, depending on your firmware setup. The entire function row? Also on a layer, mapped to Fn plus the number row. The entire navigation cluster — Home, End, Page Up, Page Down — all on layers. Everything you need is still accessible, but nothing beyond the basics has its own dedicated key.
Best For
The 60% speaks to minimalists, to programmers who’ve embraced the layer lifestyle, to anyone working with serious desk space constraints, and to people who need maximum portability (this thing slides into a bag like it’s nothing). It’s also the layout of choice for aesthetic purists who believe that every unnecessary key is visual clutter. If you look at a 60% board and feel a spark of excitement rather than anxiety, this might be your layout.
Learning Curve
Let’s talk about the elephant in the room: yes, there’s a learning curve, and no, it’s not as bad as you think. Plan on about two weeks of adjustment. During week one, you’ll be looking up combos and feeling a bit lost — arrows on Fn plus WASD, function keys on Fn plus number row, nav keys on various other Fn combos. By week two, muscle memory starts kicking in and you’ll catch yourself reaching for combos without thinking about it. By week three, it’s second nature, and you’ll wonder why you ever needed all those extra keys taking up space.
Why People Love (or Hate) It
The 60% is polarizing, and that’s part of its charm. People who love it rave about the cleanest possible aesthetic — there’s something almost zen about a keyboard with no wasted space. Maximum mouse room means your right hand barely has to move between typing and mousing. Your hands essentially never leave the home row because layers bring everything to your fingertips instead of making your fingers travel. And the portability is unmatched.
On the flip side, the people who hate it really, really hate it. Missing dedicated arrows is an absolute dealbreaker for many — some workflows just need that instant arrow key access without holding another key. The learning curve, while manageable, can be genuinely frustrating in those first few days. And if anyone else ever needs to use your keyboard — a coworker, a family member, a friend — they’re going to have a rough time with a board that’s missing half the keys they expect.
Popular 60% Keyboards
The Anne Pro 2 ($80-100) offers wireless connectivity at a budget price and is a fantastic entry into the 60% world. The Ducky One 3 Mini ($100-120) brings Ducky’s excellent build quality to the compact form factor. Keychron’s V4 and Q4 ($80-160) offer the same great value proposition as their larger siblings. The HHKB Professional ($250-350) is a Topre-switch legend with a cult following — if you know, you know. And the Pok3r ($120-140) is a classic that’s been a 60% staple for years.
60% Variants
Even within the 60% world, there’s variety. The ANSI 60% is the standard US layout and the most common variant. The HHKB layout (named after the Happy Hacking Keyboard) puts Ctrl where Caps Lock usually lives, creating a unique and highly efficient layout that its devotees swear by. And the WKL (Winkeyless) variant removes the Windows/Super keys entirely for an even cleaner look and a touch of old-school computing nostalgia.
40% and Smaller - The Extreme
Specifications
We’ve arrived at the final frontier. The 40% keyboard (and its even smaller cousins) packs just 40 to 48 keys into approximately 240mm (9.4 inches) of width. At this point, you’re working with letter keys only — sometimes literally just A through Z — essential modifiers, and multiple layers stacked on top of each other to access everything else. This is where the hobby goes from practical to philosophical.
What You Get
You get your alphabet, your essential modifiers, maximum portability (these things are tiny), and, let’s be honest, some serious bragging rights. Walking into a keyboard meetup with a beautifully built 40% board gets you the kind of respect that only comes from doing something wonderfully impractical with total commitment.
What You Lose
The number row is gone, living on a layer. And honestly, everything else is on layers too — layers upon layers, like a keyboard-sized onion of functionality. You’ll be holding modifier combinations to type numbers, punctuation beyond what’s on the base layer, and essentially every special character. It’s a commitment.
Best For
This territory belongs to hardcore enthusiasts who genuinely enjoy the challenge of optimizing their layer maps. Ortholinear explorers — people curious about grid-style key layouts — often find their way here. Configuration junkies who find deep satisfaction in tweaking firmware until every keystroke is perfectly optimized will feel right at home. And minimalism enthusiasts who want to take the concept to its absolute logical extreme will find exactly what they’re looking for.
Reality Check
Let’s be real for a moment. A 40% keyboard is not recommended for beginners, for anyone who needs immediate productivity without a ramp-up period, for gaming (where you need fast access to lots of different keys), or for shared computers where other people might need to use your setup. This is hobbyist territory — and there’s absolutely nothing wrong with that. These boards can be breathtakingly beautiful, incredibly satisfying to use once mastered, and deeply personal in their customization. But they’re niche, and they know it.
Popular 40% Keyboards
The Planck ($150-180) is the iconic ortholinear 40% — the one that started it all with its clean grid layout. The Vortex Core ($100-120) offers a staggered 40% layout for people who want the compact size without going ortholinear. And the OLKB Preonic ($180) is a 50% ortholinear board that adds a number row back, splitting the difference between extreme compact and usable daily driver.
Specialized Layouts
1800 Compact (96%)
The 1800 Compact is a clever solution for people who want full-size functionality without the full-size footprint. It takes all the keys from a full-size board and integrates the numpad directly into the right side with no gap between sections, shaving the width down to approximately 370mm compared to a full-size board’s 440mm. It’s a meaningful difference that keeps the numpad accessible without the ergonomic penalty of a sprawling layout. The Leopold FC980M and Keychron Q5 are standout options in this category.
Split Keyboards
Split keyboards take the entire concept of keyboard layout and crack it in half — literally. By separating the keyboard into independent left and right halves, split boards let you position each half at your natural shoulder width, dramatically reducing strain and promoting a much more relaxed hand position. Models like the Ergodox EZ, Kinesis Freestyle, and Keebio Iris each bring their own philosophy to the split concept. There’s a learning curve of about one to two weeks as your brain adapts to the physical separation, but ergonomics enthusiasts swear by the results. The world of split keyboards is vast enough to deserve its own dedicated guide — consider this a teaser.
Ortholinear (Grid Layout)
Ortholinear keyboards arrange their keys in straight vertical columns rather than the staggered layout we’ve all grown up with. The theory behind this design is straightforward: straight columns mean your fingers travel in more natural up-and-down motions rather than diagonal reaches, theoretically reducing finger travel and fatigue. In practice, it’s somewhat controversial and deeply preference-based — some people swear it transformed their typing, while others tried it and went right back to staggered. The Planck (40%), Preonic (50%), and ID75 (75 keys) are popular ortholinear options. Fair warning: switching to ortholinear requires essentially relearning how to type, so budget some patience.
Choosing Your Layout
Decision Tree
Choosing a layout doesn’t have to be overwhelming. Start by asking yourself a few honest questions and let the answers guide you.
First: do you use a numpad daily? Not “could I theoretically use a numpad” but “do I actually punch numbers into a numpad as part of my regular workflow?” If the answer is genuinely yes, you want a full-size or an 1800 compact. If not — and for most people it’s not — keep reading.
Next: do you need dedicated arrow keys? If arrows are essential to your workflow and you don’t want to learn a layer combo for them, look at TKL, 75%, or 65% layouts. If you’re open to putting arrows on a layer, then 60% and smaller are on the table.
Then: do you need a dedicated function row? If F1 through F12 need to be right there, physically present, staring back at you — go TKL or 75%. If you can live with them on a layer (which most people can), the 65% and 60% open up to you.
Finally: is absolute maximum portability a priority? If you’re tossing your keyboard in a bag regularly, 60% or even 40% are your best friends. If your keyboard lives on your desk and rarely moves, size is less of a constraint, and TKL, 75%, or 65% are all great choices.
By Use Case
Let’s get specific about who should buy what. If you’re doing office work with heavy data entry, a full-size board with its dedicated numpad is genuinely the right call — that numpad will pay for itself in productivity. For general office work without data entry, a TKL gives you a balanced, professional setup that anyone can sit down at.
Gamers should seriously consider a TKL or 65%, because that extra mouse space is critical when you’re flicking across a mousepad in a firefight. Programmers tend to gravitate toward 65% or 60% layouts — arrow keys are helpful for code navigation, but the function row is rarely mission-critical enough to justify the space.
If minimalist aesthetics drive your decisions, the 60% and 65% deliver the cleanest looks in the business. For travel and portability, a 60% slips into a bag with zero fuss. And if this is your first mechanical keyboard and you just want something safe and satisfying, start with a TKL — it’s balanced, familiar, and involves absolutely no learning curve.
Layout Comparison Table
| Layout | Keys | Width | Arrows | F-Row | Numpad | Learning Curve | Best For |
|---|---|---|---|---|---|---|---|
| Full-Size | 104 | 440mm | ✅ | ✅ | ✅ | None | Data entry, traditional |
| TKL | 87 | 360mm | ✅ | ✅ | ❌ | None | Gaming, balanced |
| 75% | 84 | 320mm | ✅ | ✅ | ❌ | Low | Compact + features |
| 65% | 68 | 310mm | ✅ | ❌ | ❌ | Low-Med | Enthusiasts, clean look |
| 60% | 61 | 300mm | ❌ | ❌ | ❌ | Medium | Minimalists, portable |
| 40% | 40-48 | 240mm | ❌ | ❌ | ❌ | High | Hobbyists, extreme |
Common Layout Mistakes
Mistake #1: “Bigger is Better”
It’s totally natural to assume that more keys equals a better keyboard — after all, more features is usually better, right? But in the keyboard world, that logic doesn’t hold up. A TKL or 65% is perfectly functional for the vast majority of users, and smaller boards actually offer better ergonomics because your mouse sits closer to your body’s centerline. Less reaching means less strain, and less strain means longer, more comfortable sessions. The solution? Honestly assess which keys you actually press on a daily basis. You might be surprised how few of those numpad and nav cluster keys make the cut.
Mistake #2: Going Too Small Too Fast
The allure of a tiny, beautiful 60% keyboard is real — trust me, I get it. But buying a 60% as your very first mechanical keyboard is setting yourself up for frustration. The learning curve for layers, while absolutely manageable, is genuinely annoying when you’re also adjusting to mechanical switches for the first time. Missing arrows end up being a dealbreaker for a lot of people who thought they could adapt. And the moment someone else sits down at your desk and can’t figure out how to type a question mark, you’ll understand why sharing a layer-heavy board is a pain. Start with a TKL or 65%, get comfortable with the mechanical keyboard world, and then size down later if the minimalist bug bites.
Mistake #3: Ignoring Desk Space
Here’s one that people overlook all the time: buying a full-size keyboard when your desk space is limited. A large keyboard doesn’t just take up surface area — it actively cramps your mouse movement, forces your shoulders into an awkward hunched position as you reach further to the right, and reduces your effective work area for notes, coffee, or whatever else lives on your desk. Before you buy anything, measure your available desk space and visualize where the keyboard will actually sit. A cardboard cutout at the dimensions of your target board is a hilariously low-tech but incredibly effective way to avoid this mistake.
Mistake #4: Not Considering Layers
A lot of people dismiss the 60% layout out of hand because “it’s missing too many keys.” And I understand that instinct — it looks like it’s missing too many keys. But the reality of layers is far more user-friendly than it appears from the outside. Layer combos become second nature within one to two weeks of daily use. Once they click, they actually reduce hand movement because everything you need is within reach of the home row — no more stretching to distant corners of a full-size board. And with QMK/VIA programmable firmware, you can customize your layers to match your exact workflow. Before ruling out compact layouts, watch a few videos or read some guides on how layers work in practice. You might change your mind.
Layers Explained (For Smaller Keyboards)
What Are Layers?
Think of a layer as an alternative personality for your keyboard, activated by holding down a key — usually labeled Fn (Function). While you hold that key, every other key on your board temporarily takes on a different role. On a 60% keyboard, for example, pressing the “1” key normally types “1.” But hold Fn and press “1,” and it acts as F1. Hold Fn and press WASD, and those keys become your arrow cluster. It’s the same concept as holding Shift to get capital letters — you’re already using layers without even thinking about it.
Why Layers?
Layers are the secret sauce that makes compact keyboards viable. They maintain full functionality on boards that have physically fewer keys, they reduce hand movement by bringing everything within reach of your resting hand position, and they’re endlessly customizable. Once you embrace layers, you start to realize that reaching across a full-size keyboard for a distant key was the inefficient approach all along.
Learning Curve
The learning curve follows a predictable arc that looks roughly the same for everyone. Week one is honestly a bit frustrating — you’ll be pausing to remember combos, maybe even keeping a cheat sheet nearby. Week two is where muscle memory starts forming and the pauses get shorter. By week three and beyond, it’s completely second nature. Your fingers just know where everything is, the same way they know where the letters are without looking. The key is to push through that first week without switching back to a bigger board.
QMK/VIA Programmability
If you’re going to live the layer life, you should know about QMK and VIA. QMK is an open-source firmware that powers custom keyboards, giving you god-level control over what every key does on every layer. VIA is a graphical interface that sits on top of QMK, making it dramatically easier to configure without touching code. Together, they let you create custom layer configurations tailored to your exact needs, remap literally any key to any function, set up macros for complex key combinations, and even control per-key RGB lighting. Keyboards that support QMK and VIA include the entire Keychron V-series and Q-series, the GMMK Pro, and the vast majority of custom keyboard kits on the market.
Keycap Compatibility by Layout
Here’s something that catches people off guard: not every keycap set fits every keyboard layout. Before you fall in love with a gorgeous keycap set, make sure it actually supports your board.
Full-Size and TKL owners have it easiest — virtually every keycap set on the market supports these standard layouts. You can shop with confidence and almost never worry about compatibility.
75% boards are well-supported by most modern keycap sets, but you’ll want to double-check compatibility for the right side of the board, since manufacturers make different choices about key sizes and positions in that compressed area.
65% layouts enjoy excellent support in the modern keycap market, with most sets specifically including 65% coverage. If your board uses a blocker design, just make sure the set accounts for that specific configuration.
60% keyboards are also very well supported thanks to the layout’s popularity and standardization. The one exception is the HHKB layout variant, which uses non-standard key sizes that require specific keycap sets — so check before you buy.
40% and smaller is where things get tough. Keycap support is genuinely limited at this size, and you’ll often find yourself using blank keycaps or commissioning custom sets. It’s part of the territory, and most 40% enthusiasts have made their peace with it.
Final Layout Recommendations
Alright, let’s bring it all home with some direct recommendations based on what you’re actually looking for.
If this is your first mechanical keyboard, go with a TKL (80%). It’s safe, balanced, universally familiar, and you won’t have a single regret. It’s the “you literally cannot go wrong” choice.
If you’re an enthusiast chasing aesthetics, the 65% is your best friend. It’s clean, functional, well-supported by the aftermarket, and it photographs beautifully — which matters more in this hobby than anyone wants to admit.
If maximum portability is your priority, a 60% is the way to go. It’s as compact as most people can comfortably go, but be ready for the arrow key adjustment period.
For productivity and office work, grab a full-size if you genuinely need that numpad, or a TKL if you don’t. Simple as that.
Gamers should look at TKL or 65% layouts, because in competitive gaming, every millimeter of mouse space counts.
And if you’re a hobbyist and customization junkie, a 60% or 65% opens up the widest world of aftermarket parts, mods, and endless tinkering possibilities.
Trying Before Buying
Here’s the smartest thing you can do before committing to a layout: try to experience the size in some way before money changes hands.
To visualize the size, start by measuring your current keyboard to establish a baseline. Then look up the width in millimeters of whatever board you’re considering. Cut a piece of cardboard to those dimensions and set it on your desk. It sounds silly, but seeing exactly how much space a keyboard will take up — and how much room is left for your mouse — is incredibly clarifying.
Keyboard meetups are another goldmine. Local mechanical keyboard communities host events where members bring their collections, and you can try dozens of different sizes and layouts in a single afternoon. There’s no better way to feel the difference between a 65% and a 75% than typing on both side by side. Plus, you’ll get brutally honest opinions from people who’ve actually lived with these layouts.
If meetups aren’t an option, lean on return policies. Buy from a retailer with generous returns — Amazon and MechanicalKeyboards.com are both great for this — and give the board an honest test drive for a week or two. If the size feels wrong after a real-world trial, send it back with zero guilt. Finding the right layout is worth a little logistical hassle.
Takeaway
The best keyboard layout is the one that fits your desk space, matches your actual use case — whether that’s gaming, typing, or office work — balances functionality with the aesthetics you care about, and most importantly, feels right to you. Not to your favorite YouTuber, not to the keyboard subreddit, not to your coworker who’s really into ortholinear. To you.
Start with a TKL or 65% if you’re unsure. These layouts hit the sweet spot for the vast majority of users, and you can always adjust from there.
And remember: you can always buy another keyboard in a different size. In fact, you probably will — this hobby is delightfully, dangerously addictive. Welcome to the rabbit hole.
Next Steps
- Switch Guide - Choose your switches
- Building Guide - Assemble your keyboard
- Keycaps Guide - Complete your build