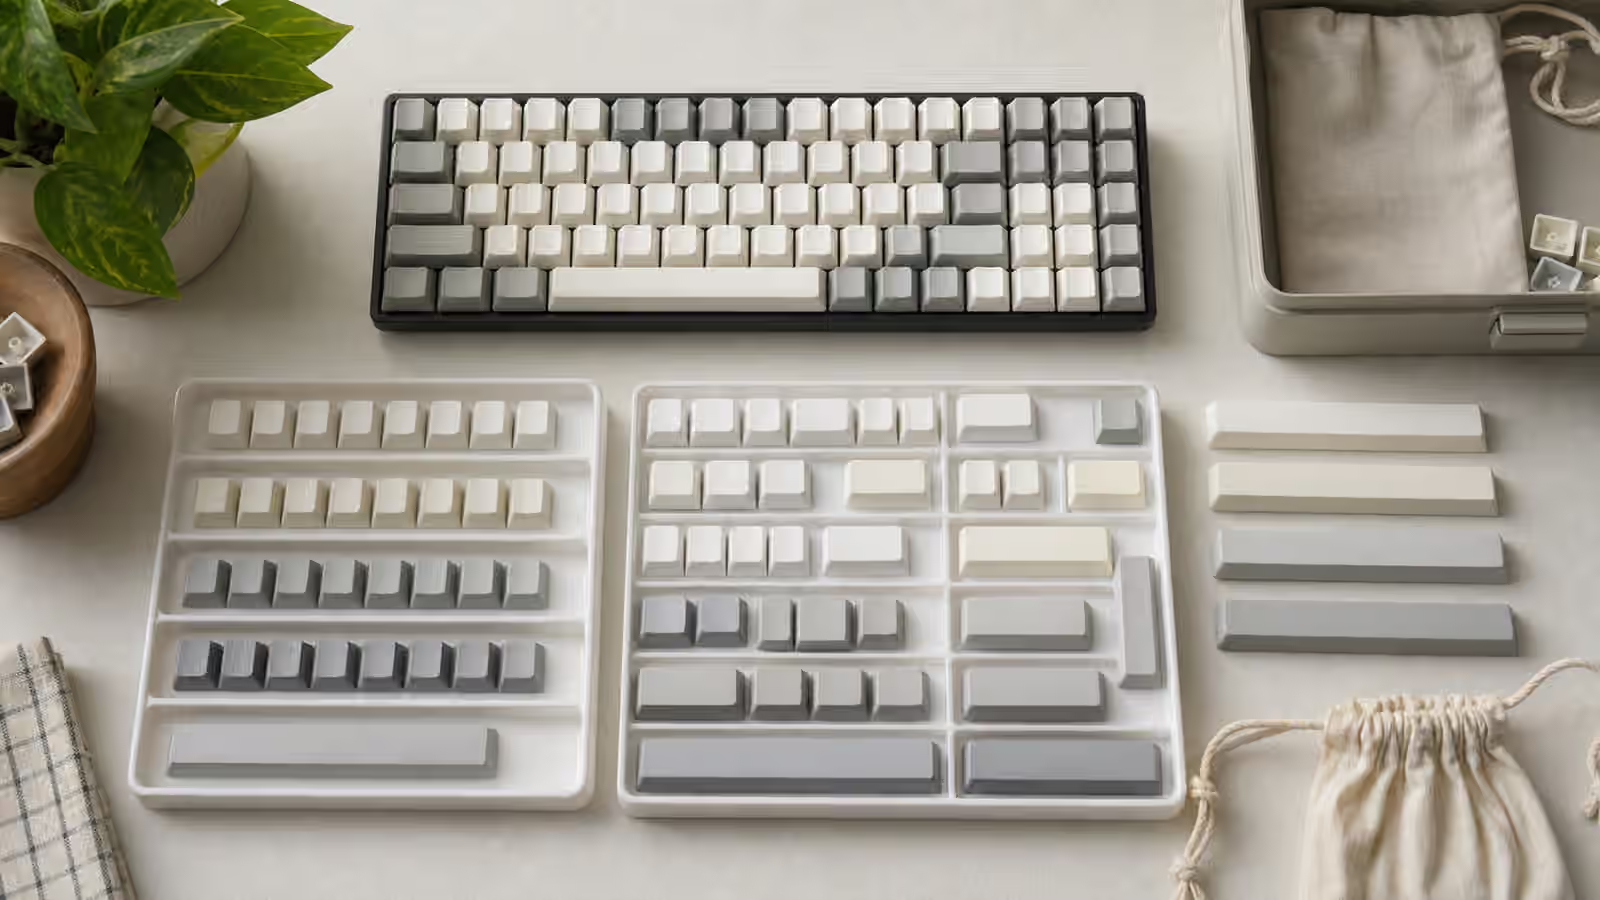
Buying keycaps feels simple until the set arrives and one key will not fit. The colors may be perfect, the texture may be exactly what you wanted, and the profile may feel good under your fingers, but none of that helps if the right Shift is the wrong size, the spacebar does not match your stabilizers, or the row shapes put a tall key where your finger expected a low one. Keycap compatibility is the quiet part of the hobby. It is less exciting than a new switch and less visible than a case, but it decides whether a keyboard looks finished or improvised.
The safest way to think about compatibility is not “will this fit a mechanical keyboard?” but “will this specific kit cover this specific layout with this specific switch family and profile?” Most mistakes come from asking the broad version of the question. A set that fits a standard full-size board may not cover a 65 percent board with a short right Shift. A set that fits a compact ANSI board may not cover ISO Enter. A set that works on an MX-style keyboard may be useless on a low-profile board. The difference is not always obvious from a product photo, especially when the photo shows a display board rather than the exact kit you are buying.
If you are still choosing the overall shape of the board, read the Keyboard Layout Guide first. Layout determines the key sizes you need. If you are choosing keycap material, profile, and sound character, the Keycaps Guide gives the broader background. This guide is narrower. It is about the fit check that should happen before the order is placed.
Start with the switch mount
Most custom mechanical keyboard keycaps are made for MX-style switch stems, the familiar cross-shaped mount used by Cherry MX and many compatible switches from Gateron, Kailh, Durock, TTC, and others. If your keyboard uses MX-style switches, most modern aftermarket keycap sets will physically mount on the switch. That is the easy part.
The trouble begins when the keyboard uses something else. Topre, Alps, buckling spring, low-profile Choc-style switches, some laptop-like mechanisms, and many proprietary low-profile boards do not accept normal MX keycaps without special adapters or dedicated caps. Even within low-profile mechanical keyboards, compatibility is fragmented. Some low-profile switches use MX-like stems, some use Choc spacing and mounts, and some boards use stabilizer designs that make ordinary caps impractical. A product page that says “mechanical” is not enough. The stem type matters.
MX compatibility also does not guarantee clearance. North-facing switches on some boards can interfere with Cherry-profile keycaps on certain rows because the keycap wall contacts the switch housing before the key bottoms out cleanly. Many people never notice this, and many profiles avoid it, but it is real enough to check when pairing Cherry-profile caps with a north-facing PCB. The Keyboard PCBs and Hot-Swap Sockets guide explains why LED orientation and switch direction are not just lighting details.
Layout size is not the same as keycap coverage
Keyboard size names are useful shorthand, but they do not fully describe the keys. A 65 percent board usually has arrows and a right-side navigation column, yet the exact right Shift, bottom row, Backspace, and modifier sizes can vary. A 75 percent board may look standard in a photo while still using a compact right Shift or unusual right-side keys. Even full-size boards can have nonstandard bottom rows, especially on older gaming keyboards and some prebuilt designs.
The unit system is the language of fit. A normal letter key is 1u wide. A standard full-size Backspace is 2u. Tab is usually 1.5u. Caps Lock is usually 1.75u. Enter on ANSI layouts is usually 2.25u. Left Shift is commonly 2.25u, while a standard ANSI right Shift is 2.75u. The most common spacebar is 6.25u, but many custom boards use 7u, split spacebars, or smaller bars on Alice-style and ergonomic layouts.
You do not need to memorize every number forever, but you do need to compare the board’s layout diagram with the keycap kit diagram. Photos are not precise enough. A short right Shift can look only slightly different from a full one until you try to install it. A 7u spacebar can look normal until it refuses to line up with the stabilizers. If the board maker provides a layout render, save it next to the keycap kitting image and compare the bottom row and right side first. Those areas cause more surprises than the letter keys.
Base kits are built around assumptions
A keycap base kit is usually designed to cover a common set of layouts. Many cover ANSI full-size, TKL, 75 percent, 65 percent, and 60 percent boards with a standard 6.25u spacebar. Some include ISO support. Some include an extra 1.75u Shift for compact boards. Some include alternate bottom-row modifiers. Others keep the base kit lean and sell extensions separately.
The important detail is that “base kit” does not mean “everything.” It means the seller chose a center of gravity. A budget in-stock set might include broad compatibility because the manufacturer wants fewer variants. A premium group-buy set might split support into separate kits to control cost or satisfy many niche layouts without forcing every buyer to pay for every key. Neither approach is automatically better. You just have to know which one you are buying.
Look closely at modifier keys, not only the alpha keys. Alphas are the easy part because most boards use the same letter keys. The modifiers reveal the assumptions: Control, Alt, Command, Code, Super, Fn, Menu, and the blank or novelty keys that replace them. A set may include the right physical sizes but use legends that do not match your operating system or preference. That is still usable, especially if you touch type, but it may bother you every time you look down. Compatibility includes the eye as well as the switch stem.
Row profile can make the right key wrong
Sculpted profiles such as Cherry, OEM, SA, and MT3 use different shapes for different rows. A key from the number row is not the same shape as a key from the home row. If you move keys around, they may physically fit on the switch but feel awkward because the slope and height are wrong. Uniform profiles such as DSA and XDA avoid this problem because each row has the same shape, though they bring their own feel trade-offs.
This matters most on compact boards and remapped layouts. If you put Delete, Home, Page Up, or a layer key in a nonstandard position, the kit needs a key in the right row and size, or you need to accept a legend mismatch. Many sets include extra row-specific keys for common compact layouts, but not all do. A 65 percent board with a right column can look clean only if the kit has the right 1u keys for those rows. Otherwise, you may end up using novelty caps, blank caps, or legends that are physically correct but semantically odd.
Row compatibility also matters for alternate typing layouts. Colemak, Dvorak, Workman, and other layouts can be difficult with sculpted, fixed-legend keycaps because moving the letter caps changes row shapes. Some sets offer homing keys or special kits, but many do not. Uniform-profile keycaps are often calmer for alternate layouts because letters can move without changing height. Another option is to leave the legends in QWERTY positions and let firmware handle the layout, but that only works if you are comfortable ignoring the printed keys.
Spacebars and stabilizers need exact agreement
The spacebar is the most common single-key compatibility failure. It needs the correct width and the correct stabilizer stem spacing. On a typical ANSI board, a 6.25u spacebar is common. Many custom layouts use 7u. Some compact, split, ergonomic, and Alice-style boards use combinations such as 2.25u and 2.75u, 2u and 2.75u, or other smaller bars. Those numbers are not decorative. If the stems do not line up with the stabilizers and switch, the bar will not install.
Spacebar shape can also behave differently from smaller keys. A warped long spacebar may technically fit but rub, tick, or return unevenly. Thicker PBT spacebars are sometimes more prone to slight warping than smaller keys, depending on manufacturing. ABS spacebars can be straighter in some sets, though they may shine faster with use. This is one reason a keycap set can be compatible on paper and still need tuning in practice. The Complete Stabilizer Guide is worth reading if the large keys fit but sound or feel wrong.
Do not assume a spare spacebar from one set solves another set’s problem. Profiles, colors, textures, and stem spacing can all differ. A spacebar that fits your stabilizers may sit at the wrong height beside the rest of the row. A bar that matches the profile may be the wrong length. A bar that looks close in a photo may clash under normal desk light. If the spacebar is unusual, buy a kit that explicitly supports it.
ISO, ANSI, Alice, and split layouts need patience
ANSI and ISO are the first regional layout split most buyers encounter. ANSI uses the wide horizontal Enter key common in the United States. ISO uses the taller Enter key and a shorter left Shift, common in many other regions. A keycap set that only supports ANSI will not properly cover an ISO board, even if most of the keys are shared. ISO support usually needs the ISO Enter key, short left Shift, and the extra key near Enter or left Shift depending on the exact layout.
Alice-style and split ergonomic boards add another layer. They may use split spacebars, extra B keys, unusual thumb keys, and different modifier sizes. Some keycap sets include Alice support in the base kit, but many require a separate spacebar or extension kit. Split keyboards can be even more specific, especially if they use thumb clusters or low-profile switches. The Split Keyboards and Ergonomic Layouts guide covers the broader reasons to choose those shapes. For keycaps, the practical rule is simple: unusual geometry needs an explicit kitting check.
Compact boards can be deceptive because they look more standard than they are. A 60 percent board with a normal bottom row is easy. A 60 percent board with arrows squeezed into the bottom right may need smaller modifiers and a short Shift. A 75 percent board may keep the function row but still require several 1u navigation keys in the correct rows. The more a layout compresses, the less you should trust a generic compatibility claim.
Low-profile boards are their own category
Low-profile mechanical keyboards deserve a separate warning because their keycaps can look familiar while behaving differently. Some low-profile boards use reduced-height MX-style switches and caps. Others use Kailh Choc-style spacing, which changes both the stem and the key spacing. Some prebuilt low-profile boards use proprietary stabilizers or keycap shapes that make aftermarket replacement difficult.
This does not make low-profile boards bad. It just means the upgrade path is narrower. If you plan to change keycaps later, confirm support before buying the board, not after. The Low-Profile Mechanical Keyboards guide explains the travel, sound, and desk-height trade-offs, but keycap availability is one of the hidden costs. A low board with no suitable replacement caps may still be the right tool if you like it as shipped. It is a poor choice if your main goal is keycap experimentation.
A careful pre-order check
Before buying, slow the process down enough to compare evidence. Find the exact keyboard layout diagram, not just the marketing name. Find the exact keycap kit diagram, not just a glamour photo. Check the switch stem family, then the spacebar, then the right Shift, then the bottom row, then ISO or regional support, then row-specific keys for compact columns. If the board uses south-facing MX switches and a standard ANSI layout, the check will be quick. If it uses a split spacebar, Alice curve, compact arrows, or low-profile switches, the check should take longer.
It also helps to separate physical compatibility from aesthetic satisfaction. A blank 1u key can fill a missing spot and make the keyboard usable. That does not mean the set truly supports the layout in the way you wanted. Some people enjoy using novelty keys or blanks to solve odd positions. Others want every legend to match. Both preferences are valid, but they lead to different buying decisions.
Keycap compatibility rewards patience. The goal is not to become anxious about every set. The goal is to notice the few measurements and assumptions that matter before money changes hands. Once the kit matches the board, keycaps become fun again: color, texture, sound, profile, and the feel of a finished keyboard instead of the frustration of one missing key.