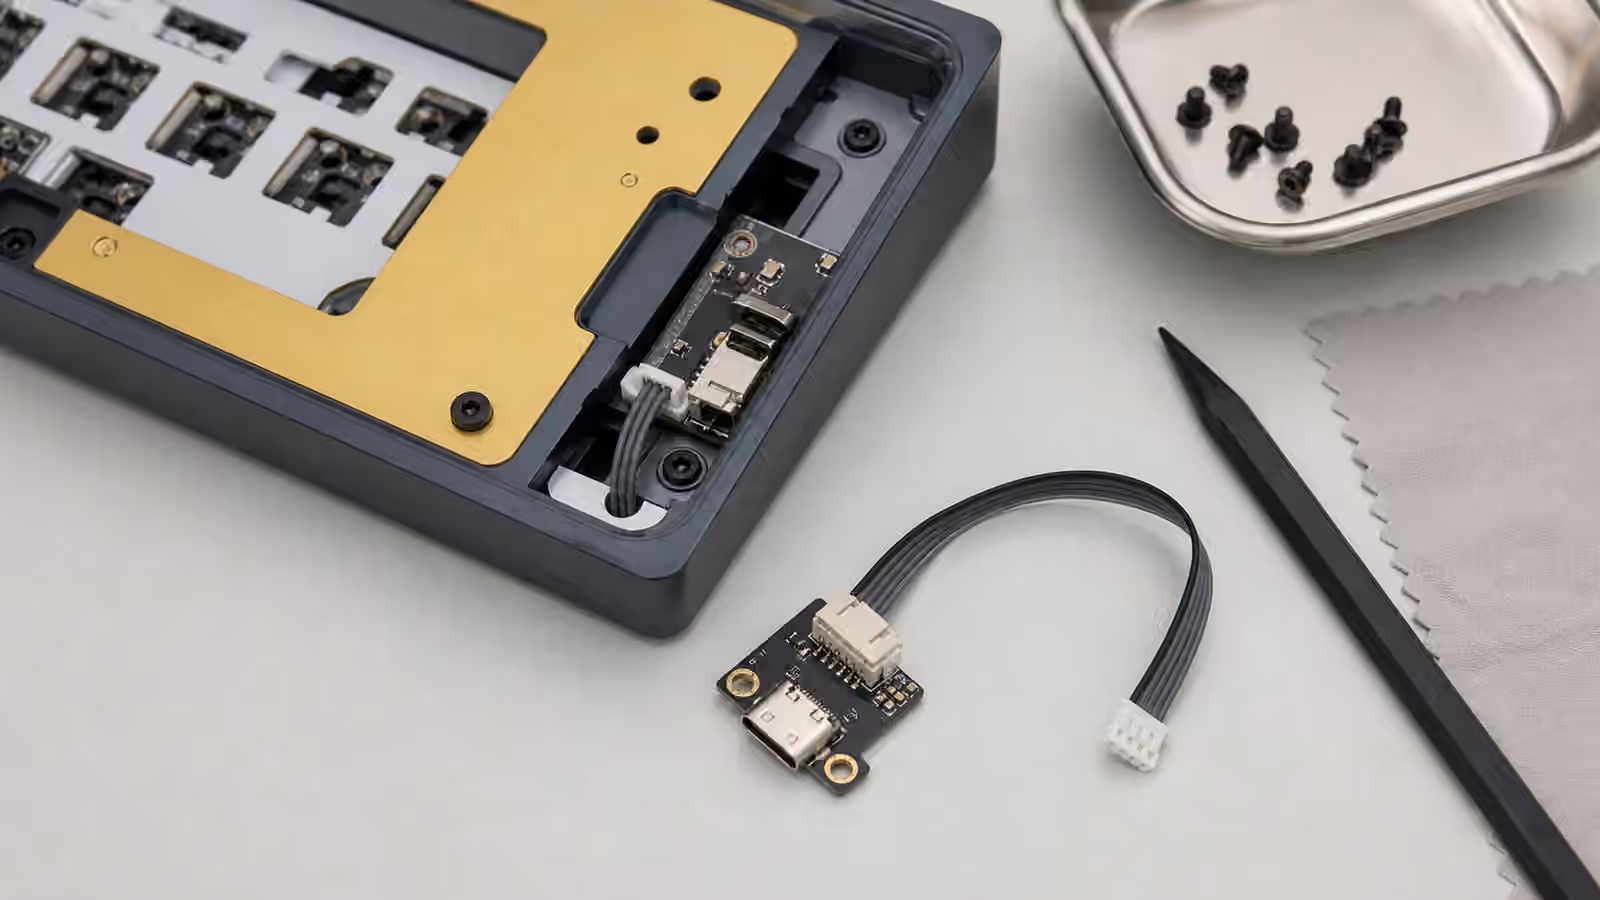
A keyboard daughterboard is easy to ignore because it is small, hidden, and usually boring when everything works. In many custom and enthusiast boards, the USB-C port does not sit directly on the main PCB. Instead, it lives on a small separate board mounted near the case opening. A short internal cable connects that daughterboard to the main PCB. This design can make case construction cleaner and protect the main PCB from cable stress, but it also adds a delicate internal connection that deserves careful handling.
Most owners only meet the daughterboard when opening a case for foam, stabilizer work, plate changes, or troubleshooting. That is exactly when accidents happen. The top and bottom case separate, the builder lifts the PCB assembly, and a cable that looked slack becomes taut. A connector cracks, a wire pulls, or the USB port no longer lines up with the case. Good daughterboard care is not complicated. It is mostly about noticing the cable before it becomes the thing holding the keyboard together.
Why daughterboards exist
Putting the USB port on a small separate board gives designers flexibility. The main PCB can sit where the switches need to be, while the daughterboard sits where the case wants the port. This is useful in gasket-mounted boards, o-ring boards, and cases where the internal assembly moves slightly under typing. The cable can absorb a little separation between the typing assembly and the case shell. The daughterboard can also be replaced more easily than a full PCB if the external port wears out or is damaged.
That flexibility has limits. The internal cable is not a handle, hinge, or strain relief system by itself. The connectors are small, and many use JST-style housings or similar low-profile plugs designed for careful insertion, not repeated yanking. The daughterboard screws are also small, and the USB-C receptacle must line up with the case opening. If the port is forced into a bad position every time the cable is plugged in, the solder joints and board can suffer over time.
For a broader view of case alignment, read Keyboard Case Fit, Tolerances, and Assembly Alignment . Daughterboard problems often look like electrical issues, but the cause can be mechanical pressure from a case that was assembled in a hurry.
Open the case as if a cable is attached
Before lifting the PCB or plate assembly, assume a cable connects it to the lower case until you prove otherwise. Loosen the case, separate it slightly, and look inside before pulling farther. If a cable is present, identify where it plugs into the main PCB and where the daughterboard sits. Give yourself enough angle and light to unplug it by the connector housing, not by the wires.
Many connectors have a friction fit. Some have tiny latch behavior. Do not pry upward randomly with a metal tool. If the plug slides horizontally into a socket, pulling straight up may damage it. If you are unsure, study the connector shape and move slowly. A plastic spudger can help nudge a housing, but fingers are often safer if there is room. The Keyboard Tool Kit guide covers the general habit of using tools to reduce force rather than add it.
Once unplugged, keep the cable path visible. It is easy to trap the cable under foam, under the PCB edge, or between case halves during reassembly. A pinched cable may work at first and fail later when the board flexes or moves on the desk. That intermittent failure can look like firmware trouble, switch chatter, or a bad external USB cable.
Cable routing is part of the build
Internal cable routing should have a natural path. It should not stretch across sharp posts, fold tightly against a screw boss, or press hard into foam. A little slack helps, but too much loose cable can also get pinched or buzz inside the case. The best path is boring: a gentle curve from main PCB to daughterboard, clear of screw holes, stabilizers, batteries, and any moving plate assembly.
Foam changes this picture. Case foam, plate foam, silicone pads, and other dampening layers can reduce hollow sound, but they can also crowd the daughterboard area. If foam pushes the cable into the case wall or lifts the daughterboard out of alignment, trim or reposition the dampening rather than forcing the case closed. The Keyboard Foam and Dampening guide is useful because sound tuning should not compromise basic reliability.
Wireless boards need extra restraint. Batteries, antennas, power switches, and charging boards may all share the same small interior. Do not route a daughterboard cable across a battery in a way that creates pressure, and do not use metal tape or loose conductive material near connectors. A quiet keyboard that becomes unreliable is not a successful mod.
USB-C port alignment matters
The external cable should plug in cleanly without lifting the daughterboard, scraping the case, or requiring an angle. If the USB-C connector sits too high, too low, or too far back from the cutout, the case may be putting constant stress on the daughterboard. Loosen the daughterboard screws slightly, align the port, and retighten gently if the design allows it. Do not overtighten small screws to force alignment. That can warp the board or strip a post.
Custom cables can reveal alignment problems because some have thicker shells than ordinary cables. A deeply recessed port may work with the included cable but reject a decorative cable. That is not always a daughterboard fault, but it matters in daily use. The Keyboard Cables and USB Connectivity guide covers the external side of the connection. The internal side is about making sure the port is not carrying more mechanical load than it should.
If a cable only works when held at a certain angle, stop using that angle as a solution. It may keep the board alive temporarily, but it also adds leverage to a small connector. Test with a known-good cable, inspect the port, and check the daughterboard mount before the problem spreads.
Diagnosing intermittent connection failures
Daughterboard trouble often appears as disconnects when the keyboard moves, when the cable is bumped, or after a case has been opened. It can also appear as a board that works outside the case but fails after final assembly. That pattern points toward pressure, cable seating, or port alignment more than firmware. If the keyboard disconnects at random while untouched, the cause may still be the external cable, USB port, hub, firmware, or host computer, so keep the diagnosis disciplined.
Start outside the keyboard. Use a known-good data cable and a direct USB port. If the problem remains, open the case carefully and inspect the internal cable. Look for a plug that is not fully seated, wires pulling out of the housing, a sharp crease, or foam pressing into the connector. Then test the board while it is open and stationary. If it works open but fails closed, the case assembly is changing something.
The Keyboard Chatter, Double Inputs, and Missed Keystrokes guide covers input symptoms from another angle. A daughterboard issue can masquerade as missed input when the whole connection drops briefly, but true chatter from one switch usually follows a narrower pattern.
Replacements and compatibility
If a daughterboard or cable is damaged, replace it with a compatible part rather than a merely similar one. Connector pinouts can differ even when plugs look alike. A USB-C daughterboard from one keyboard may not match another keyboard’s main PCB. Cable length, connector orientation, screw spacing, and electrostatic protection can all vary. Use the board maker’s replacement part or documentation when possible.
Do not assume every small white connector is interchangeable. JST is often used as a generic shorthand, but there are many connector families, pitches, and orientations. Forcing the wrong cable into the wrong socket can damage both sides. If the keyboard is rare or expensive, take photos before unplugging anything and label parts in a way that does not rely on memory.
Replacement is sometimes the most sensible repair. USB ports receive daily stress, especially on boards that travel. A daughterboard design can localize that wear to a smaller part. That is a strength, not a failure. The mistake is pretending the small part needs no care because it is hidden.
A careful assembly habit
Before closing the case, pause and trace the connection path with your eyes. The daughterboard is screwed down, the port lines up with the cutout, the internal cable is fully seated, the cable has a gentle route, no foam presses on the connector, and no screw will land on the wire. Then close the case gradually and test the keyboard before all keycaps or decorative pieces return.
That habit adds a minute and can save a repair. Daughterboards are not exciting upgrades, but they are part of the keyboard’s reliability. They let designers build cleaner cases and more flexible mounts, and they give users a replaceable port path. Treat the small cable with the same respect you give switches, stabilizers, and plates. The keyboard will feel no different when the daughterboard is handled well, which is exactly the point.