QMK & VIA Firmware Guide
Programming your keyboard unlocks its full potential. The goal isn’t to turn your keyboard into a science fair project—it’s to make the board fit your hands and your habits: put Backspace where you want it, make a compact layout behave like a full-size board, and turn repetitive actions into one-keystroke moves.
Two tools dominate modern customs: VIA (the easiest way to remap keys instantly) and QMK (the deep, programmable foundation underneath). You can start with VIA in minutes, and “graduate” into QMK only when you want features that a GUI can’t expose.
What Is Keyboard Firmware?
Firmware Explained
Firmware is the software embedded in the keyboard that translates a physical keypress into the signal your computer receives. It’s why the same physical key can be “A” today, “Escape” tomorrow, and “Mute” on a different layer—without installing drivers or changing anything on your computer.
Firmware controls key mapping, layers (multiple layouts on one keyboard), macros (shortcuts and sequences), lighting, and “behavior features” like tap‑hold actions, key combos, or mouse keys.
QMK Firmware
What Is QMK?
QMK (Quantum Mechanical Keyboard) is open-source keyboard firmware that offers the deepest customization most people will ever need. It’s the “write your own behavior” option: you define what keys do, how layers behave, and how special interactions work.
In QMK you can build custom keymaps, use many layers (often far more than you’ll realistically use), create macros and shortcuts, and enable advanced behaviors like tap‑dance (tap vs hold), combos (multiple keys trigger an action), mouse keys, and RGB control. Some boards also support audio features.
QMK is common in custom keyboards and DIY kits, and it’s also supported by many enthusiast-friendly prebuilts (for example, some Keychron Q-series boards).
The trade-off is workflow: you edit a keymap, compile firmware, and flash it to the keyboard.
Difficulty is moderate. You don’t need to be a professional developer, but you do need comfort following instructions and troubleshooting basic tooling.
QMK Pros and Cons
QMK’s upside is power: it’s open-source, widely supported, constantly improved, and can express almost any behavior you can describe. The downside is friction: you compile, you flash, and you’ll eventually touch code.
VIA
What Is VIA?
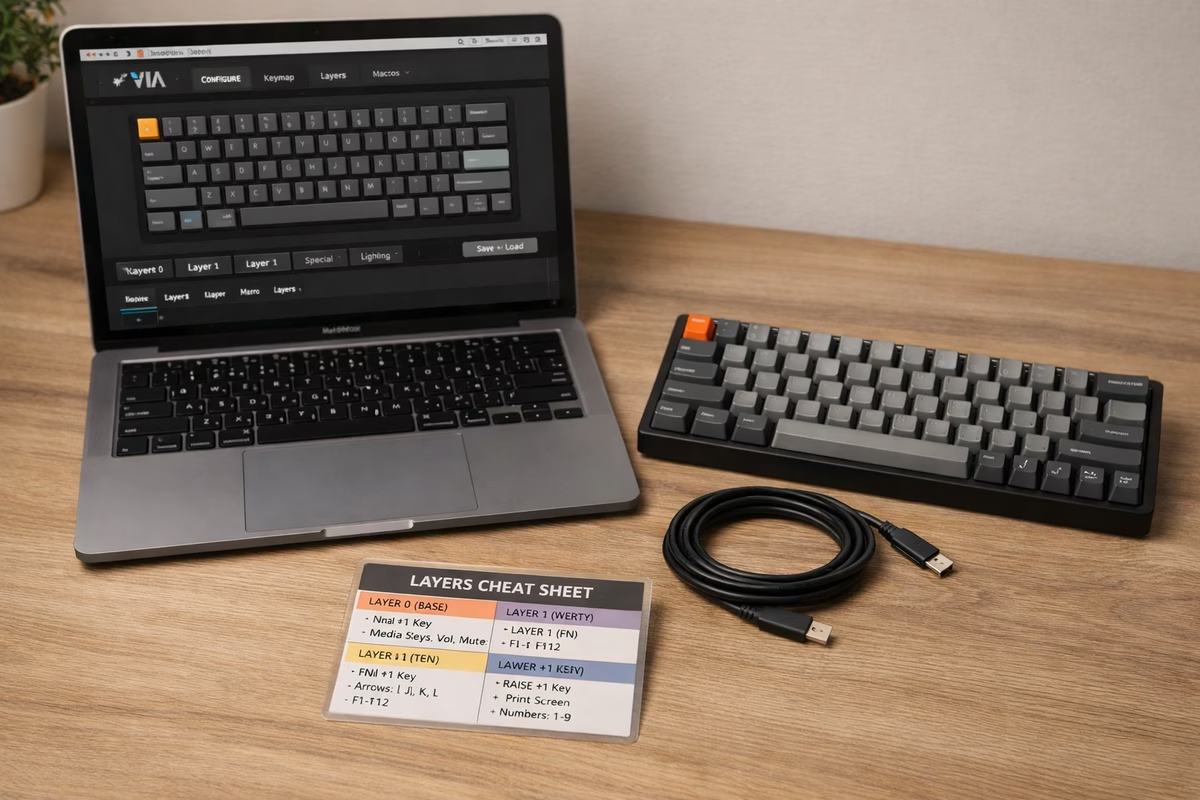
VIA is a graphical interface that talks to VIA-enabled QMK firmware. It’s the “move keys around and it just works” experience: no compiling, no flashing (once the board is VIA-enabled), and instant feedback.
With VIA you get real-time remapping, visual layer editing, basic macro creation, and lighting control. The defining feature is immediacy: changes apply instantly.
Compatibility depends on whether your keyboard is running VIA-enabled firmware. Many enthusiast boards support it, but it’s not universal.
The workflow is simple: open VIA (web or desktop), plug in the keyboard, and drag keys to remap.
Difficulty is low; it’s designed for beginners.
VIA Pros and Cons
VIA’s upside is speed and simplicity: it’s beginner-friendly, changes are instant, and settings persist on the keyboard. The downside is that it can’t expose every advanced QMK behavior, and you need VIA support on the board.
QMK vs. VIA Comparison
Here’s the practical difference. VIA optimizes for speed: you make a change and feel it immediately. QMK optimizes for control: you can define deeper behaviors, but you pay with a compile/flash loop.
For most people, VIA is the right starting point. Move keys, build a couple layers, and get your board “comfortable.” Reach for full QMK when you want things like complex tap‑hold behaviors, combos, custom macros, or anything that requires logic beyond what a GUI can express.
Verdict: Use VIA if you want easy, real-time remapping and full QMK if you need advanced behavior that a GUI cannot expose cleanly.
Getting Started with VIA
Step 1: Check VIA Compatibility
Start by confirming that the board actually supports VIA. The manufacturer site, the official specs, or a quick search for the model name plus “VIA” usually answers it fast. Boards like the Keychron Q-series, GMMK Pro, many Mode and KBDfans boards, and a large share of customs are common examples, but compatibility is never worth assuming.
Step 2: Download VIA
You have two real options: the web version at https://usevia.app, which is the simplest path because it needs no installation, or the desktop app from https://github.com/the-via/releases. For most people, the browser version is the right default.
Step 3: Connect Keyboard
Plug the keyboard in over USB, open VIA, and in the ideal case the layout simply appears. If it does not, the usual causes are mundane: the board is not actually running VIA-enabled firmware, the cable is bad, the port is fussy, or VIA itself needs a restart.
Step 4: Remap Keys
Remapping in VIA is intentionally boring. Click the key on the virtual board, click the replacement in the lower panel, and the change applies immediately. A classic first move is turning Caps Lock into Backspace, because it shows how quickly firmware can make a board feel more personal.
Step 5: Create Layers
Layers are just multiple layouts living inside one keyboard. They matter most on compact boards because they let you borrow missing keys only when you need them. In VIA, you switch to another layer at the top of the interface, remap keys there, then assign a way to access that layer with commands like MO(1) or TG(1). A common setup is simple: Layer 0 for normal typing, Layer 1 for arrows, media, and function keys, usually reached by holding an Fn key.
Step 6: Create Macros
Macros are automated key sequences triggered by one key, which makes them useful for repeated phrases, snippets, and application shortcuts. In VIA, you create them in the Macros tab, fill an empty slot with text or a sequence, then assign that macro to a key. Email signoffs are the obvious beginner example, but the same idea works for boilerplate code and repetitive app commands.
Getting Started with QMK (Advanced)
Step 1: Set Up QMK Environment
QMK asks for a little more seriousness up front. You should be comfortable with a terminal, have Git installed, and use a text editor you can tolerate for code. The usual setup path is installing QMK Toolbox for flashing, cloning qmk_firmware, installing the QMK CLI with python3 -m pip install qmk, and then running qmk setup. If that sounds like more commitment than you want right now, QMK Configurator at https://config.qmk.fm is the softer entry point.
Step 2: Find Your Keyboard
Inside the firmware repo, every supported board has its own directory under keyboards/. Find your brand and model, then the keymaps/ folder inside it. For a Keychron Q1, for example, you would end up at keyboards/keychron/q1/keymaps/.
Step 3: Edit Keymap
Keymap File:
Usually keymap.c in your keyboard’s keymap folder.
Basic Keymap Structure:
const uint16_t PROGMEM keymaps[][MATRIX_ROWS][MATRIX_COLS] = {
    [0] = LAYOUT(
        KC_ESC,  KC_1,    KC_2,    KC_3,    // Row 1
        KC_TAB,  KC_Q,    KC_W,    KC_E,    // Row 2
        // ...
    ),
};
Key codes follow a readable convention: KC_A through KC_Z are letters, KC_1 through KC_0 are numbers, and names like KC_ENT, KC_BSPC, and KC_SPC stand for Enter, Backspace, and Space.
Full list: https://docs.qmk.fm/#/keycodes
Step 4: Add Layers
Layer Syntax:
const uint16_t PROGMEM keymaps[][MATRIX_ROWS][MATRIX_COLS] = {
    [0] = LAYOUT( /* Base layer */
        KC_ESC,  KC_1,    KC_2,    MO(1),   // Hold 4th key for layer 1
    ),
    [1] = LAYOUT( /* Layer 1 - Media */
        KC_MUTE, KC_VOLD, KC_VOLU, _______,  // Media controls
    ),
};
Layer Keys:
MO(1): Momentary layer (hold to activate)TG(1): Toggle layer (tap to switch)LT(1, KC_SPC): Tap for space, hold for layer 1
Step 5: Compile Firmware
Command:
qmk compile -kb <keyboard> -km <keymap>
Example:
qmk compile -kb keychron/q1 -km default
Output:
Compiled .hex or .bin file in qmk_firmware/ root.
Step 6: Flash Keyboard
In QMK Toolbox, load the compiled .hex or .bin file, put the board into bootloader mode, and flash it. Getting into bootloader usually means pressing a reset button on the PCB, holding Escape while plugging in, or using a reset key you already assigned. When the flash succeeds, the keyboard reboots into the new firmware automatically.
Common QMK Features
Tap Dance
Tap Dance lets one key do different things based on how you use it. A single key might type E on tap, act as Ctrl on hold, and send Esc on a double tap. It is the kind of feature that makes compact boards feel larger without actually giving them more keys.
Mouse Keys
Mouse Keys turns part of the keyboard into a pointing device. It is niche, but useful if you are chasing a mostly keyboard-driven workflow. Codes like KC_MS_U, KC_MS_D, KC_BTN1, and KC_BTN2 map directly to cursor movement and clicks.
Combos
Combos trigger an action when you press multiple keys together. Mapping J + K to Esc is the classic example. The real value is ergonomic: they let you move common shortcuts closer to the home row and reduce awkward pinky reaches.
Auto Shift
Auto Shift treats a short tap and a longer press as different intentions. Tap A and you get a; hold it slightly longer and you get A. Some people love it because it reduces Shift usage, while others find the timing unnatural. It is a good example of a feature that only matters if it fits your hands.
Layer Examples
Example 1: 60% Keyboard with Function Row Layer
On a 60 percent board, a common pattern is keeping Layer 0 as a normal typing layout with no function row or dedicated arrows, then using Layer 1 to turn the number row into F-keys and WASD into arrows. Usually an Fn key handles the transition, which is why 60 percent boards can feel surprisingly complete once the layer is designed well.
Example 2: Gaming Layer
Gaming layers are a good reminder that firmware is not just for shrinking keyboards. You can keep Layer 0 standard, then build a separate play-focused layer where Caps Lock becomes crouch, Tab becomes inventory, Q and E handle leaning, and anything accident-prone like media keys disappears. Toggling that layer on with something like Fn+G keeps the board context-aware.
Example 3: Numpad Layer for 60%
Another classic move is a numpad layer on a 60 percent board. The base layer stays normal, while the right side temporarily becomes a numpad when you hold Fn. Once you learn the pattern, it often feels more efficient than reaching to a detached numpad.
Macro Examples
Example 1: Email Signature
An email-signature macro is the simplest useful example: one key can type a full signoff with your name and contact details, which is enough to make the value of macros obvious immediately.
Example 2: Zoom Controls
Conference controls are another good use case. A few single-key macros can handle mute, video, and hand-raise commands without asking you to remember the shortcut stack every time.
Example 3: Code Snippets
Code snippets are where macros start to feel genuinely luxurious. If you repeatedly type the same loop, function scaffold, or markup shell, one key can insert the whole structure and let you fill in the meaningful parts.
Troubleshooting
Keyboard Not Detected in VIA
First confirm compatibility, then make sure the board is actually running VIA-capable firmware. After that, the fixes are the usual suspects: update firmware if needed, swap cable or port, and restart VIA.
QMK Compile Errors
Compile errors are usually either syntax mistakes in keymap.c, an outdated local QMK tree, a wrong keyboard path, or an incorrect keycode. qmk update fixes more problems than people expect.
Flashing Fails
If flashing fails, double-check bootloader mode first, then try a different USB port, verify the firmware file you loaded, and make sure QMK Toolbox is targeting the right MCU.
Keys Not Working After Flash
If keys stop behaving after a flash, go back to a known-good firmware image, then inspect the keymap and any matrix-related changes. Testing with the default keymap is the fastest way to figure out whether the problem is your custom logic or something lower-level.
Recommended VIA Layouts
For 60% Keyboards
A sensible 60 percent VIA layout keeps Layer 0 standard, uses Layer 1 for arrows, F-keys, and media, Layer 2 for a numpad, and Layer 3 for RGB, reset, and system functions.
For 65% Keyboards
A 65 percent board already has arrows, so the extra layers can stay simpler: Layer 1 for F-keys and media, Layer 2 for a numpad and macros, and Layer 3 for system functions.
For 75% Keyboards
On a 75 percent board, Layer 0 already covers most of your needs, so Layer 1 is usually enough for media and macros, with Layer 2 reserved for deeper functions and RGB control.
Resources
Official Documentation
- QMK Docs: https://docs.qmk.fm
- VIA Website: https://www.caniusevia.com
- QMK Configurator: https://config.qmk.fm
Community Resources
- r/olkb (QMK subreddit)
- QMK Discord: https://discord.gg/qmk
- YouTube tutorials (search “QMK tutorial”)
Takeaway
VIA is best for:
- Beginners
- Real-time remapping
- Simple macros and layers
QMK is best for:
- Advanced users
- Complex features (tap dance, combos)
- Ultimate customization
Start with VIA: Easy to learn, instant results.
Graduate to QMK: Once you need advanced features.
Programming transforms keyboards: Unlock efficiency, personalization, and workflow optimization.
Next Steps
- Building Guide - Build a keyboard with QMK/VIA support
- Layout Guide - Choose layout that benefits from layers
- Keyboard Database - Find keyboards with VIA support