Building Your Coffee Setup
If you only remember one idea from this guide, make it this: your equipment should make good coffee easy to repeat. A “perfect” setup that’s annoying to use becomes inconsistent fast. A simple setup with a good grinder, a scale, and a forgiving brewer will usually beat a complicated setup with weak fundamentals.
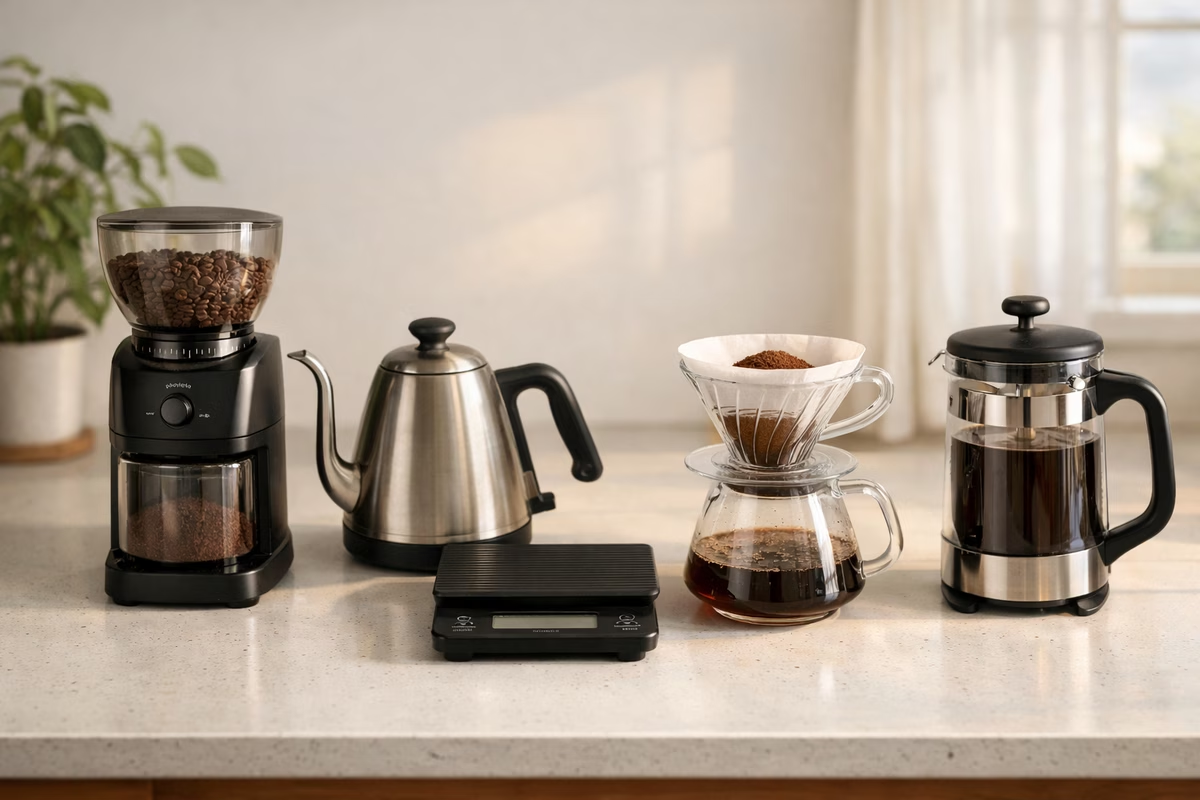
So here’s the deal—think of your coffee gear like a system with three essential jobs. First, you need something to make particles, and that’s your grinder. Second, you need a way to control your ratio and repeatability, which is where a scale and timer come in. And third, you need a way to create extraction in a way you actually enjoy, whether that’s a simple brewer and kettle or a full-on espresso machine. Everything else—the fancy accessories, the premium kettles, the Instagram-worthy automation gadgets—only matters once those three core jobs are handled well. Nail the fundamentals first, and you’ll be shocked how far a simple setup can take you.
The Most Important Purchase: Grinder
Let’s talk about the single most impactful purchase you’ll ever make for your coffee journey. It’s not a sleek espresso machine. It’s not a hand-thrown ceramic pour-over dripper. It’s the grinder. Seriously. The grinder is the foundation of everything. A modest brewer paired with a capable grinder and fresh beans regularly produces better cups than expensive machines paired with inconsistent grinding. If that surprises you, you’re not alone—most people walk into coffee thinking the brewer is the star of the show, when really it’s the grinder doing the heavy lifting behind the scenes.
Why do grinders matter so much? It comes down to three things that quietly shape every cup you brew. First, uniform particle size reduces that frustrating “sour and bitter at the same time” problem. When your grounds are a jumble of boulders and dust, the tiny particles over-extract (bitter) while the big chunks under-extract (sour), and you end up with a confused, unpleasant cup. A good grinder narrows that spread dramatically. Second, fresh grinding preserves the volatile aromatics that make coffee smell and taste amazing. Ground coffee stales shockingly fast—within minutes, the most delicate flavors start fading. Grinding right before you brew captures all of that fleeting goodness. Third, adjustability lets you dial in the grind size to perfectly match your brewer and recipe. A pour over wants a different grind than a French press, and espresso is a whole different universe. Without the ability to adjust, you’re stuck making compromises every single time.
Burr Grinders Explained
Burr grinders work by crushing coffee between two precisely machined surfaces—think of them like tiny millstones for your beans. You adjust the grind size by changing the distance between the burrs: closer together for fine espresso grinds, further apart for coarser French press grinds. It’s elegant, predictable, and infinitely more consistent than a blade whacking randomly at beans.
Now, you’ll inevitably stumble into the great flat-vs-conical debate. People get passionate about this, but here’s the practical version that’ll save you hours of forum rabbit holes. Flat burrs tend to shine when you’re brewing filter coffee and you want clarity and separation of flavors—those bright, “I can taste the blueberry note!” moments. Conical burrs, on the other hand, are popular for espresso and all-round use. Many conical grinders are also quieter and more compact, which your household will appreciate at 6 AM.
But here’s what really matters: in real life, build quality and burr alignment matter just as much as burr shape—maybe even more. A perfectly aligned conical grinder will outperform a sloppy flat burr grinder any day. So for beginners, don’t lose sleep over the geometry. The best grinder is the one that’s reliable, adjustable for your brew method, and pleasant enough to use every single day without dreading it.
How to Choose a Grinder (Fast)
Choosing a grinder doesn’t have to be overwhelming if you ask yourself three simple questions.
What do you brew most? This is the big one. If you’re exclusively making filter coffee like V60 or drip, your needs are different from someone chasing espresso, and both are different from the person who wants to bounce between methods. Knowing your primary brew method narrows the field immediately.
How do you like to work? Some people love the ritual of weighing out beans each time, and for them, a single-dosing grinder is perfect—you put in exactly what you need, there’s minimal retention of old grounds, and it’s easy to switch between different coffees throughout the day. Other people want speed and convenience, and they’d rather fill a hopper once, press a button, and go. Neither approach is wrong—it’s about what fits your morning routine and personality.
How sensitive are you to noise and mess? This one is easy to underestimate, but it matters more than you’d think. Quiet grinders and low-static designs make mornings genuinely nicer. A grinder that sprays chaff across your counter every time you use it is the kind of “small annoyance” that quietly reduces how often you brew. Death by a thousand tiny frustrations is real, and a clean, quiet grinder removes one of the biggest friction points in your daily routine.
Grinder Recommendations by Budget
Rather than memorizing a laundry list of model names that’ll be outdated in a year, it’s more useful to figure out which lane you’re in and then find the best option in that lane.
If you’re filter-first, meaning you mostly brew pour over or drip, prioritize clean, consistent grinding and an adjustment range specifically designed for the filter spectrum. You don’t need micro-fine espresso adjustments, but you do want a grinder that handles the medium-to-coarse range with grace and precision.
If you’re espresso-first, your priorities shift toward fine adjustment control and grind stability. Espresso is incredibly sensitive to tiny changes—a single notch on the grinder can be the difference between a gusher and a choker. You need a grinder that gives you granular control in that fine range.
If you’re into mixed brewing, bouncing between espresso and filter depending on your mood, prioritize ease of switching between settings and low retention. You don’t want yesterday’s espresso grounds contaminating today’s pour over, and you don’t want to spend five minutes re-dialing every time you change methods.
The comparison widget below captures a few common reference points across these lanes. Use it as a starting map, then verify that the grinder’s adjustment style matches how you actually brew.
If you’re brand new and want the simplest possible recommendation: buy a repairable entry burr grinder, learn your brew method, and only then decide whether your next move is “better filter grinding” or “espresso capability.” Starting simple isn’t settling—it’s strategy.
Scales
Scales are the quiet hero of good coffee, the unsung workhorse that nobody puts on their Instagram story but that secretly makes everything else work better. They turn “I think I poured enough” into repeatable ratios, and they let you change one variable at a time—which is the only way to actually learn what affects your cup.
When you’re shopping for a scale, there are a few features worth paying attention to. You’ll want 0.1g precision if you plan to make espresso, since a gram or two can dramatically change an espresso shot, though honestly that precision is nice for everything else too. A built-in timer is incredibly handy if you brew pour over, because tracking your total brew time alongside your pour weight gives you two data points for dialing in recipes. And fast response matters more than you’d think—when you’re pouring water over a V60, you want the weight to update in real time so your feedback loop feels natural, not laggy.
Budget kitchen scales can absolutely work for filter coffee. If you brew espresso, though, a faster and more precise scale is worth the upgrade sooner rather than later—you’ll feel the difference immediately when you’re trying to stop a shot at exactly 36 grams.
Kettles
Kettles matter in two ways that people tend to overlook: temperature and control.
If you brew pour over, a gooseneck kettle is one of those upgrades that makes you wonder how you ever lived without it. The narrow spout gives you dramatically more control over your pour—slow spirals, precise targeting, gentle pulses—all of which are nearly impossible with a standard wide-mouth kettle that dumps water like a fire hose. If you mostly brew immersion methods like French press or AeroPress, almost any kettle is fine since you’re just pouring water in and letting it sit. No fancy pour technique required.
Electric kettles with temperature control are the convenience king, especially if you brew a lot. Set it to 205°F, walk away, come back to perfectly heated water every time. Stovetop kettles are perfectly capable too—just add a thermometer and a little attention, and you’ll get great results. The key point beginners often miss is this: a kettle can’t fix bad grinding, but it can absolutely make pour over feel easier, more enjoyable, and more repeatable. It removes one more variable from the equation, letting you focus on the things that matter most.
Water (The Hidden “Equipment”)
Here’s a secret that took me way too long to learn: water is equipment. Seriously. Your cup of coffee is roughly 98% water, so if your water tastes off, your coffee will taste off—except amplified. If your tap water tastes great on its own, congratulations, you’re already ahead of the game and can probably skip this section entirely.
But if your water tastes chlorinated, metallic, or just generally funky, coffee will take those flaws and put them under a magnifying glass. You don’t need to become a water scientist or start mixing mineral packets like a chemist, though. A simple approach works beautifully. If you notice unpleasant flavors in your coffee that seem to persist no matter what beans or technique you use, try a basic carbon filter—either a pitcher filter or an under-sink system. That alone fixes the most common water issues. If you see heavy mineral scale building up in your kettles or machines, you may want to look into softer water, not just for taste but for the longevity of your equipment. Scale buildup is the silent killer of coffee machines, clogging heating elements and reducing efficiency over time.
The beautiful thing about good water is that it improves every brewer you own simultaneously and reduces maintenance headaches across the board. It’s one of those invisible upgrades that makes everything else just a little bit better.
Brewing Devices
The “best” brewer is the one that fits your mornings. Full stop. Don’t let anyone tell you that their method is the only way to make “real” coffee. The best coffee is the coffee you enjoy drinking, made in a way that fits your life.
That said, different brewers have genuinely different strengths, and understanding those strengths helps you pick the right tool for your preferences. If you want clarity and you enjoy the meditative process of slowly pouring water in circles, pour over is your world—it rewards attention and technique with bright, nuanced cups. If you want something forgiving that produces rich, full-bodied cups without requiring laser precision, immersion methods like French press or Clever Dripper are wonderfully laid-back. If you want speed and consistency for multiple cups, especially when you’re making coffee for a household, a good automatic drip machine is honestly hard to beat. And if you want espresso and milk drinks, welcome to the deep end—it’s a hobby with a genuine learning curve, but the rewards are spectacular once you get there.
Pour Over
Pour over is where art meets science, and it’s one of the most rewarding ways to brew coffee once you get the hang of it.
The Hario V60 is the icon of the pour-over world, and for good reason. Priced anywhere from $8 for the plastic version up to $30 for ceramic, glass, or copper, it’s absurdly affordable to get started. The V60 is best for bright, clean coffee in single servings, and its cone shape with spiral ribs gives you enormous control over extraction. The pros are hard to argue with—it’s cheap, versatile, and capable of genuinely excellent results that rival anything you’d get at a specialty café. The one caveat is that it does require technique. Your pour pattern, speed, and consistency all matter, which means your first few cups might be inconsistent. But that’s also what makes it fun—there’s always something to refine.
The Chemex is the one your design-obsessed friend has on their counter, and honestly, it deserves the aesthetic praise. At $40 to $50, it’s a bit more of an investment, and it’s best for clean coffee in batches of three or more servings. Those thick proprietary filters produce stunning clarity—almost tea-like transparency in the cup. The downsides? Those same thick filters are more expensive to replace than standard ones, and the glass body is beautiful but fragile. Handle it with the respect it demands.
The Kalita Wave is the forgiving friend of the pour-over family. Priced at $25 to $35, it features a flat-bottom design that distributes water more evenly across the coffee bed, which means your pour technique matters less than with a V60. It’s a fantastic choice if you want pour-over quality without the steep learning curve. The only real drawback is that its proprietary wave filters can be harder to find in stores, so you might want to stock up online.
Immersion
Immersion brewing is the “just add water and wait” approach, and it’s gloriously forgiving.
The French Press is the granddaddy of home coffee brewing, and it remains one of the best ways to make a rich, full-bodied cup. Priced between $20 and $80, it’s best for multiple servings and anyone who loves simplicity. The brewing process couldn’t be easier—add coarse grounds, pour in hot water, wait four minutes, press, pour. It’s incredibly forgiving of minor technique variations, and the metal mesh filter lets the coffee’s natural oils through, creating that thick, luxurious body that paper-filtered methods can’t match. The tradeoffs are some sediment in your cup (which you learn to love or at least tolerate) and cleanup that’s a bit more involved than just tossing a paper filter. If you want specific recommendations, the Bodum Chambord at around $35 is the classic—durable, well-designed, available in 4 to 8 cup sizes. If you want something more refined, the Espro P7 at about $100 features a dual filter system that gives you a noticeably cleaner cup, plus vacuum insulation that keeps your coffee hot far longer.
The AeroPress might be the most beloved piece of coffee equipment ever invented, and its cult following is well deserved. At $30 to $40, it’s built for travel, versatility, and single servings. It’s essentially indestructible, brews in about two minutes, and is wildly versatile—you can make everything from pseudo-espresso concentrate to clean, tea-like filter coffee just by changing your recipe. It’s portable enough to throw in a backpack and forgiving enough to produce good coffee even when you’re half asleep. The only real limitation is that it makes one cup at a time, so if you’re brewing for a crowd, you’ll need something else.
The Clever Dripper at about $25 is the best of both worlds—an immersion brewer that drains through a paper filter when you set it on your cup. Think of it as a French press that gives you a clean, sediment-free cup. It’s wonderfully easy and consistent, making it an excellent choice for beginners or anyone who wants great coffee with minimal fuss. The downsides are minor: it’s only available in plastic, and the drain can be a bit slow. But for the price and the results, it’s hard to complain.
Espresso
Espresso is the most equipment-sensitive brew method in coffee, and it’s worth understanding why before you dive in. The basic physics are intense: you’re forcing hot water through a tightly packed puck of very finely ground coffee at high pressure, and tiny changes in grind size, dose, or temperature have outsized effects on the final shot. If you love espresso drinks—lattes, cappuccinos, cortados, or just a perfectly pulled ristretto—you can absolutely do it at home. But go in with the right expectations, and you’ll be much happier.
There are three truths about home espresso that will save you real money if you internalize them early. First, the grinder is more important than the machine for shot quality. This is counterintuitive because the machine is the big, shiny, expensive thing on the counter, but it’s the grinder that determines whether your puck is even, your extraction is balanced, and your shots are repeatable. Second, all-in-one machines are convenient and look great in marketing photos, but the integrated grinder is almost always the first limiting factor—it’s where manufacturers cut costs. Third, “better” machines tend to buy you temperature stability and workflow comfort, not magical taste. A stable brewing temperature means more consistency shot to shot, and better steam wands mean silkier milk faster, but the coffee itself still depends primarily on the grinder and the beans.
Use the tier widget below as a map for your espresso journey. Pick the tier that matches your patience and budget, then put whatever’s left of your budget into the grinder. Seriously—that advice will serve you better than any specific machine recommendation.
Automatic Drip
Drip coffee is honestly underrated in the specialty world, and it deserves way more respect than it gets. It’s the easiest way to make consistent coffee for multiple people, and a good drip machine removes nearly all the variables that make manual brewing tricky.
What matters most in a drip machine is that it brews at a proper temperature—somewhere around 195 to 205°F—and distributes water evenly over the bed of coffee. These two things separate a great drip machine from a mediocre one. A thermal carafe is usually a better choice than a hot plate, because hot plates keep “cooking” your coffee long after it’s brewed, slowly turning it bitter and stale. A thermal carafe just holds the heat passively, keeping your coffee tasting fresh for much longer.
If you’re going to buy one thing for drip, make it a reputable, standards-focused machine rather than a bargain brewer that never quite reaches the right temperature. The SCA (Specialty Coffee Association) certifies machines that meet their brewing standards, and those certifications are a reliable shortcut to finding something good.
Accessories
Accessories are where people overspend, and the coffee industry is very happy to let you. There’s always one more gadget, one more tool, one more “essential” accessory that promises to transform your brewing. The simple rule that cuts through all the noise: buy accessories that remove friction or improve repeatability, and skip everything else.
There are a few core helpers that genuinely earn their keep. A thermometer is worthwhile if you use a stovetop kettle, since water temperature matters and guessing is surprisingly inaccurate. Investing in the right filters for your brewer is another easy win—cheap, off-brand paper filters can add papery off-flavors that undermine all your other efforts, while quality filters are one of the cheapest upgrades you can make. And a basic airtight storage container for your beans keeps them fresh longer by protecting against oxygen, light, and moisture. Nothing fancy needed—just something that seals well.
If you’re brewing espresso daily, there are a few additional tools that become genuinely useful: a proper milk-frothing pitcher for latte art and steaming, a WDT (Weiss Distribution Technique) tool for breaking up clumps in your portafilter, and a knock box for quickly disposing of spent pucks. These aren’t essential on day one, but once you’re pulling shots every morning, they smooth out the workflow considerably.
Budget Equipment Paths
If you want a clean shopping plan without the overwhelm, here are four paths to consider. Treat them as templates rather than rigid prescriptions—swap the brewer to match your personal preferences, and adjust the specific models based on what’s available and well-reviewed when you’re buying.
Starter Kit ($100–200)
This path focuses on fundamentals: a capable manual grinder, a forgiving brewer, and a scale. That’s it. It sounds almost too simple, but this trio will produce genuinely delicious coffee and teach you the right skills from day one. The manual grinder keeps costs down while still delivering burr-quality consistency, the forgiving brewer (think French press or AeroPress) means you don’t need perfect technique to get a great cup, and the scale ensures you can repeat whatever you discover. This setup is also wonderfully portable—throw it all in a bag and you’ve got great coffee anywhere.
Pour Over Enthusiast ($300–500)
This path is for people who’ve caught the bug and love the ritual of carefully crafting each cup. The biggest upgrade here compared to the starter kit is a better grinder—likely an electric burr grinder that produces more uniform particles with less effort. Pair that with a gooseneck kettle that gives you the pour control to execute recipes precisely, a quality pour-over dripper like a V60 or Kalita Wave, and you’re brewing at a level that rivals many specialty cafés. This is the sweet spot where the investment-to-quality ratio is arguably the best in all of coffee.
Espresso Starter ($800–1,200)
This path works when you accept that espresso is sensitive and you’re willing to invest in the learning curve. The key insight here is to prioritize the grinder—it should get at least half your budget. Then choose a machine that matches your willingness to learn and tinker. At this price point, milk drinks become realistic rather than just “strong coffee with heated milk,” and you’ll start understanding why people get obsessed with pulling the perfect shot. It’s a commitment, but it’s also incredibly rewarding.
Ultimate Setup ($2,500–3,500)
This path is about stability and workflow. At this level, you’re not buying dramatically “better” coffee per se—you’re paying for temperature consistency shot after shot, better steam pressure for silky microfoam, and day-to-day comfort that makes the process feel effortless. The grinder at this tier makes dialing in straightforward rather than frustrating, and the machine holds its temperature so reliably that you can focus entirely on the beans and the recipe. It’s the setup where everything just works, and the only limit is your skill and your beans.
Upgrade Priority Order
Most coffee upgrades feel disappointing because they’re done out of sequence. People buy a gorgeous espresso machine before they have a capable grinder, or they invest in a premium kettle before they own a scale. A simple priority order prevents that heartbreak and makes sure every dollar you spend delivers a noticeable improvement.
Start with a burr grinder—this is upgrade number one, always, no exceptions. It’s the single biggest improvement you can make to your coffee quality. Next, invest in fresh beans from a local roaster or quality online source, because the best grinder in the world can’t save stale, pre-ground supermarket coffee. Third, get a scale so you can start brewing with precision and repeatability. Fourth, once you’ve been brewing for a while and know what you want to improve, consider a better grinder—moving from entry-level to mid-range is one of the most satisfying upgrades in coffee. Fifth, think about your brewing device, though honestly this is often a lateral move rather than a true upgrade since technique matters more than hardware at this point. Sixth, pick up a gooseneck kettle if you’re into pour over—it makes a noticeable difference in control and enjoyment. And seventh, only after your grinder quality is truly sorted, consider an espresso machine. This is last for a reason—espresso without a good grinder is an exercise in frustration, not enjoyment.
Maintenance
Maintenance isn’t glamorous, but it’s the difference between equipment that lasts years and equipment that slowly degrades your coffee without you realizing it. The two enemies you’re fighting are coffee oils and mineral scale, and both are sneaky because they build up gradually.
For grinders, brush out residue regularly—ideally after every session, though a quick brush every few days is realistic for most people. Do an occasional deeper cleaning with grinder-specific cleaning tablets or a thorough brush-out so old rancid oils don’t dull the flavor of your fresh beans. You’ll be amazed at how much better your coffee tastes after cleaning a grinder you thought was already clean. For espresso machines and kettles, mineral scale is the silent assassin. Periodic descaling is essential, and how often you need to do it depends on your water hardness. Soft water areas might get away with descaling every few months; hard water areas might need it monthly. For brewers in general, rinse thoroughly after every use and do a deep clean occasionally with a gentle cleaner or hot water soak. That “mysterious staleness” people sometimes notice in their coffee is often old oils and residue in a brewer that looks clean but isn’t.
Taking care of your gear isn’t just about longevity—it’s about making sure every cup tastes as good as it should. A few minutes of maintenance a week protects hundreds of dollars of equipment and keeps your coffee tasting fresh and vibrant.
Next Steps
- Master your equipment with our Brewing Methods Guide
- Choose beans to showcase in our Coffee Beans Guide
- Try our Equipment Budget Calculator to plan your setup
- Browse our Coffee Database for recommended pairings
Great equipment enables great coffee, but technique and fresh beans matter more than expensive gear. Start with a solid grinder and simple brewer, then upgrade as your skills and palate develop. Enjoy the journey!