Tempering chocolate looks like wizardry until you learn what it actually is: controlling how cocoa butter crystallizes. That’s it. No cauldrons, no incantations—just you, a thermometer, and a little patience. Once you understand the “why” behind tempering, the “how” suddenly feels a lot less intimidating.
So what does good temper actually get you? When chocolate is properly tempered, it sets shiny instead of dull, it snaps cleanly instead of bending sadly in your fingers, it releases from molds like a dream, and it stays stable at room temperature so you don’t have to worry about ugly fat bloom creeping in later. Tempered chocolate is the difference between something that looks like it came from a professional chocolatier and something that looks like it melted on the dashboard of your car.
On the flip side, when chocolate is not tempered—or when it loses its temper along the way—things go sideways fast. You’ll see streaky or gray patches on the surface, feel a soft or crumbly texture where there should be firmness, and eventually notice a dusty white film developing over time. It’s still perfectly safe to eat, but let’s be honest: you didn’t go through all that effort just to make chocolate that looks like it’s been through a rough week.
This guide is going to walk you through a home-kitchen process that genuinely works, no professional equipment required. You’ll learn what “temper” actually means in plain language, which tempering method suits your setup best, the temperature targets you can trust, and how to troubleshoot the most common failure modes so you can fix things on the fly instead of starting over in frustration.
What tempering is (in plain language)
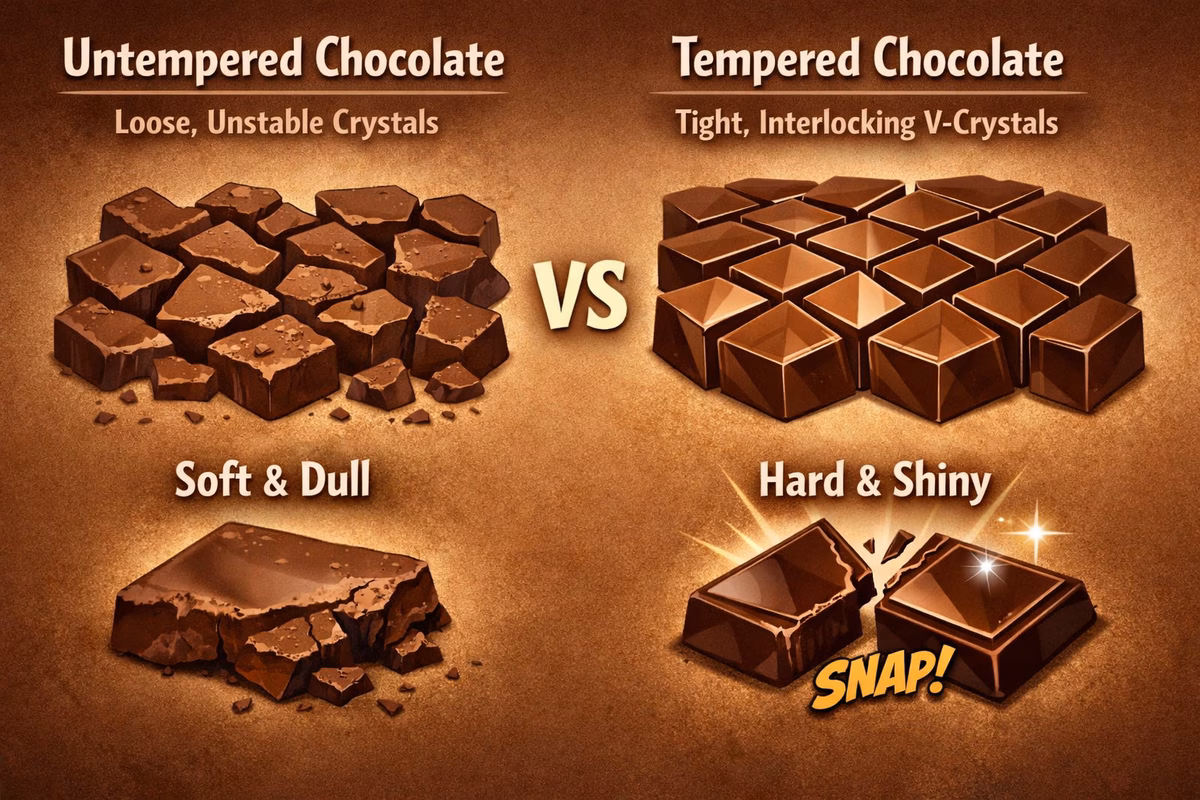
Here’s the thing about chocolate that makes tempering necessary: it contains cocoa solids, which give you all that gorgeous flavor, and cocoa butter, which is the fat component. Cocoa butter is a bit of a diva—it can solidify into several different crystal forms, and most of those forms are unstable, leading to dullness, softness, and bloom. But there’s one crystal form (confectioners call it Form V) that’s the sweet spot. That’s the one that gives you the glossy sheen, the satisfying snap, and the long shelf stability. Tempering is simply the process of coaxing your chocolate into forming those ideal crystals.
In practice, tempering comes down to three stages. First, you melt the chocolate completely to erase any existing crystal structures—you’re giving it a clean slate. Then, you cool it down in a controlled way to encourage those desirable stable crystals to form and multiply. Finally, you hold the chocolate in a specific working temperature range so those good crystals dominate while keeping the chocolate fluid enough to actually use.
If that still sounds a bit science-textbook-y, here’s the even simpler version: you melt chocolate, you cool it while “teaching” it how to set properly, and then you use it while it’s sitting in the sweet spot. Think of it like training a puppy—you’re guiding the chocolate toward good behavior, and if you’re patient and consistent, it rewards you beautifully.
What you need (minimal kit)
Good news: you don’t need a marble slab the size of a dining table or a cabinet full of specialized gadgets. You can temper chocolate with remarkably little equipment, and chances are you already have most of it in your kitchen.
Essentials
At the bare minimum, you need four things. A thermometer is non-negotiable—an instant-read or a probe thermometer both work perfectly. You’ll also need a heat-safe bowl (glass or stainless steel), a spatula for stirring, and a dry workspace. That’s genuinely it for the must-haves. If you have these four things, you can temper chocolate tonight.
Helpful
A few extras make life easier, though. A silicone spatula is wonderful because it scrapes the sides of the bowl cleanly and doesn’t hold heat the way metal does. Parchment paper gives you a non-stick surface for setting your finished pieces. If you’re adventurous enough to try the tabling method (more on that soon), a bench scraper is your best friend. And if you find your chocolate a touch too thick, a small amount of cocoa butter can thin it out without compromising the temper.
One strict requirement: keep water away
This is the one rule you absolutely cannot break. Water is the mortal enemy of melted chocolate. Even a tiny droplet—we’re talking a single splash from a wet spoon—can cause your chocolate to seize, turning it into a thick, grainy, heartbreaking paste that’s nearly impossible to recover for tempering purposes.
So before you begin, dry your bowl and every tool completely. Be vigilant about steam—if you’re using a double boiler, make sure condensation isn’t dripping back into the chocolate. And keep your wet hands far, far away from the bowl. A quick towel-dry before touching anything chocolate-related will save you a lot of grief.
Choose your method: seed, tabling, or microwave
There are multiple roads to well-tempered chocolate. The best method isn’t the one that sounds the fanciest—it’s the one you can repeat reliably every time. Let’s walk through your three main options.
Method A: Seeding (best for most home kitchens)
The seeding method is the one I recommend for most people, especially if you’re just getting started. The concept is elegant: you melt most of your chocolate to erase its crystal structure, then add finely chopped pieces of already-tempered chocolate (your “seed”) to introduce stable crystals into the mix. As you stir, those seed crystals act like little teachers, encouraging the melted chocolate to crystallize the right way.
The pros are compelling: it’s consistent, relatively low-mess, and genuinely beginner-friendly. The only real con is that you need some unmelted, already-tempered chocolate to use as your seed—but since a fresh bar from the store is already tempered, that’s an easy requirement to meet.
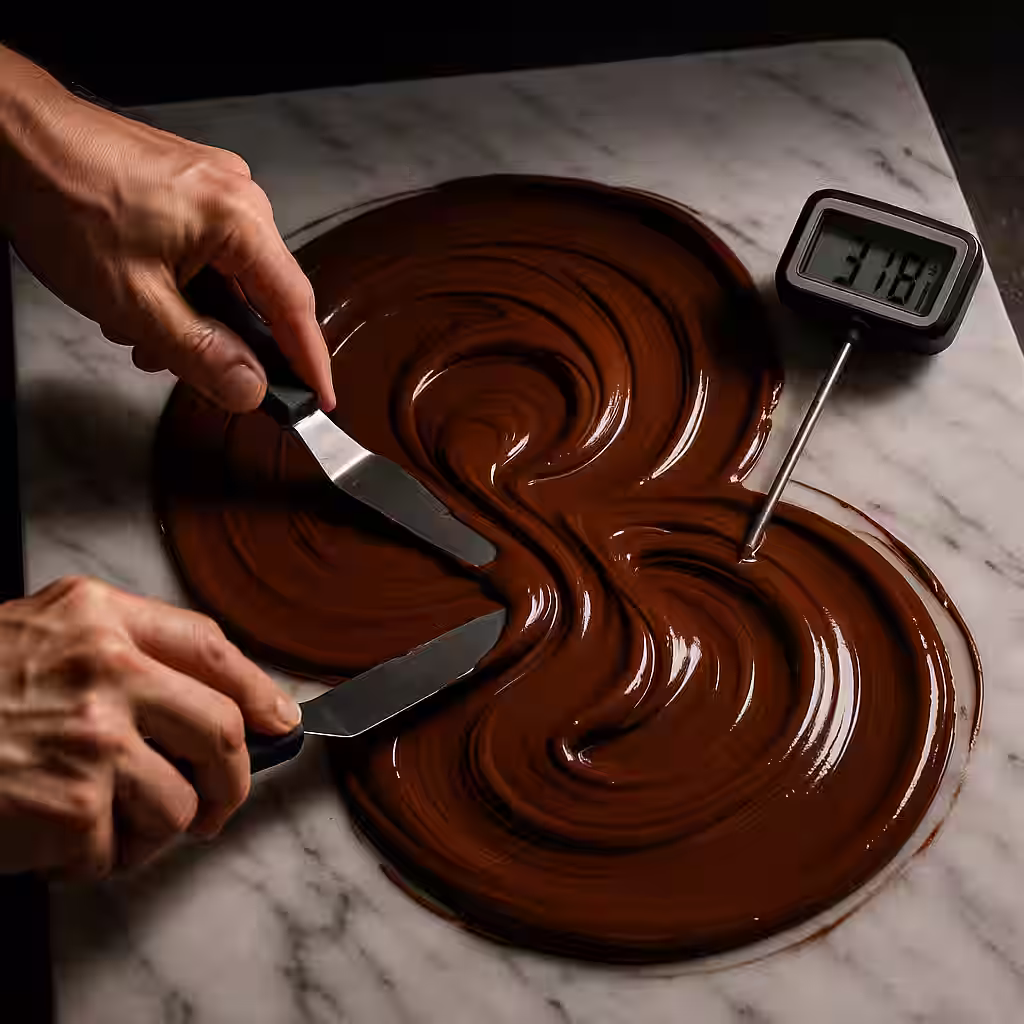
Method B: Tabling (great if you like tactile control)
Tabling is the dramatic, visually impressive method you’ve probably seen in videos of professional chocolatiers. You melt your chocolate fully, pour a portion of it onto a cool marble or granite surface, and then work it back and forth with a bench scraper and spatula. This rapid cooling on the stone surface encourages crystal formation, and then you scrape it all back into the bowl with the remaining warm chocolate.
The pros are that it’s fast and gives you very fine-grained control over the process—you can literally feel the chocolate thickening as the crystals form. The cons? It’s messier, requires a clean cool surface, and has a bit of a learning curve. But once you get the hang of it, it’s deeply satisfying in a tactile, almost meditative way.
Method C: Microwave seeding (fast, small batches)
If you’re working with a small amount of chocolate and want to keep things quick and simple, the microwave seeding method is your friend. You microwave chocolate in very short bursts, stirring between each one, and seed it by adding chunks of tempered chocolate as you stir.
The big advantage is that you don’t need a double boiler at all, and the whole process is quick. The downside is that it’s easier to overheat if you get impatient with those microwave bursts—and overheated chocolate means you’ve blown past your crystal-forming window and need to start over.
If you’re tempering for the first time, go with seeding. It’s the most forgiving and gives you the best feel for how tempered chocolate behaves.
Temperature targets (use these as anchors)
Exact numbers vary slightly depending on the brand and specific formulation of your chocolate, but these ranges are reliable anchors that work well as a home guide. Write them on a sticky note and keep it near your workspace—you’ll reference them constantly at first.
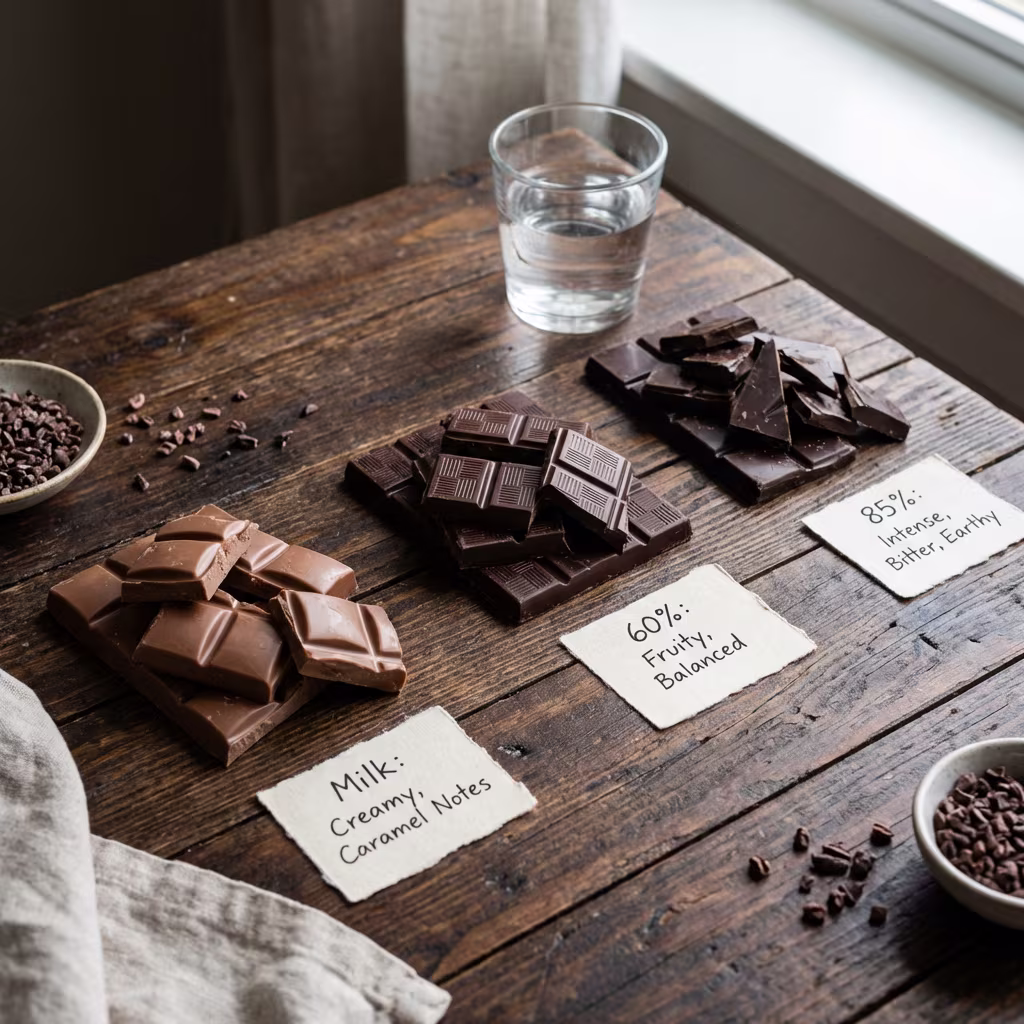
Dark chocolate
For dark chocolate, you’ll melt to about 45–50°C (113–122°F) to fully erase existing crystals. Then cool it down to roughly 27–29°C (81–84°F) to encourage those good Form V crystals to nucleate. Finally, gently bring it back up to a working temperature of about 31–32°C (88–90°F), where it’s fluid enough to use but packed with stable crystals.
Milk chocolate
Milk chocolate runs a few degrees cooler across the board. Melt to about 40–45°C (104–113°F), cool to approximately 26–28°C (79–82°F), and work at around 29–30°C (84–86°F). The milk solids make it a bit more sensitive to heat, so err on the lower side if you’re unsure.
White chocolate
White chocolate is the most delicate of the three—those milk solids and the absence of cocoa solids make it particularly heat-sensitive. Melt to about 40–45°C (104–113°F), cool to roughly 25–27°C (77–81°F), and work at about 28–29°C (82–84°F). Go low and slow with white chocolate; it scorches easily and will let you know by turning an unappetizing yellow.
Step-by-step: Seeding method (the reliable default)
Alright, let’s actually do this. The seeding method is the workhorse technique for dipping, bark, molded chocolates, and decorative drizzles. Follow these steps and you’ll have beautifully tempered chocolate ready to work with.
1) Chop your chocolate
Start by chopping your chocolate into small, even pieces. This isn’t just busywork—uniform pieces melt evenly, which gives you much better temperature control. Divide your chocolate into two portions: about 70–80% goes into your melting bowl, and the remaining 20–30% is your seed, which you’ll set aside for later.
One quick note: if you’re tempting to use chocolate chips, know that many chips are formulated with additives that help them hold their shape in cookies, which means they can be stubbornly thick when melted. A good-quality chocolate bar or couverture-style chocolate is significantly easier to temper and gives better results.
2) Melt the main portion
Now melt that larger portion gently. You have two good options here. With a double boiler, set your bowl over a pot of gently simmering water—emphasis on gentle. A rolling boil creates too much steam, and remember, steam is just water in disguise. Make sure your bowl sits snugly so condensation can’t sneak in from below.
If you prefer the microwave, use 15–30 second bursts and stir thoroughly between each one. The chocolate won’t look fully melted after the first couple of rounds—that’s fine. Residual heat does a lot of the work, so stop microwaving while there are still a few small pieces visible and just keep stirring. They’ll melt from the surrounding heat. Bring the chocolate up to the melt temperature for your type: 45–50°C for dark, 40–45°C for milk or white.
3) Cool with seed
Remove your bowl from the heat source and add a handful of your reserved seed chocolate. Now stir—steadily, patiently, lovingly if you’re into that sort of thing. You’re trying to bring the temperature down into the crystal-forming range, and that seed chocolate is introducing stable crystals that will propagate through the whole batch.
If your seed pieces melt almost instantly and the temperature barely budges, add more seed. If you got a little overzealous and the temperature dropped too far—or you’ve got stubborn chunks that refuse to melt—you can fish out a few unmelted pieces or warm the bowl very gently for just a moment. The key here is gradual cooling with constant agitation.
4) Rewarm to working temperature
Once you’ve cooled into the lower range, it’s time to gently warm the chocolate back up to its working temperature. This is the step where most people trip up. They either don’t rewarm enough, leaving the chocolate too thick to work with, or they overshoot the target temperature and blow right past the temper they just carefully built.
Go slowly here. A few seconds hovering the bowl over warm (not hot) water works beautifully. Alternatively, a few very short microwave pulses of just 5–10 seconds, stirring between each, will do the trick. Check your thermometer frequently. You’re aiming for that working range—31–32°C for dark, 29–30°C for milk, 28–29°C for white—and not a degree more.
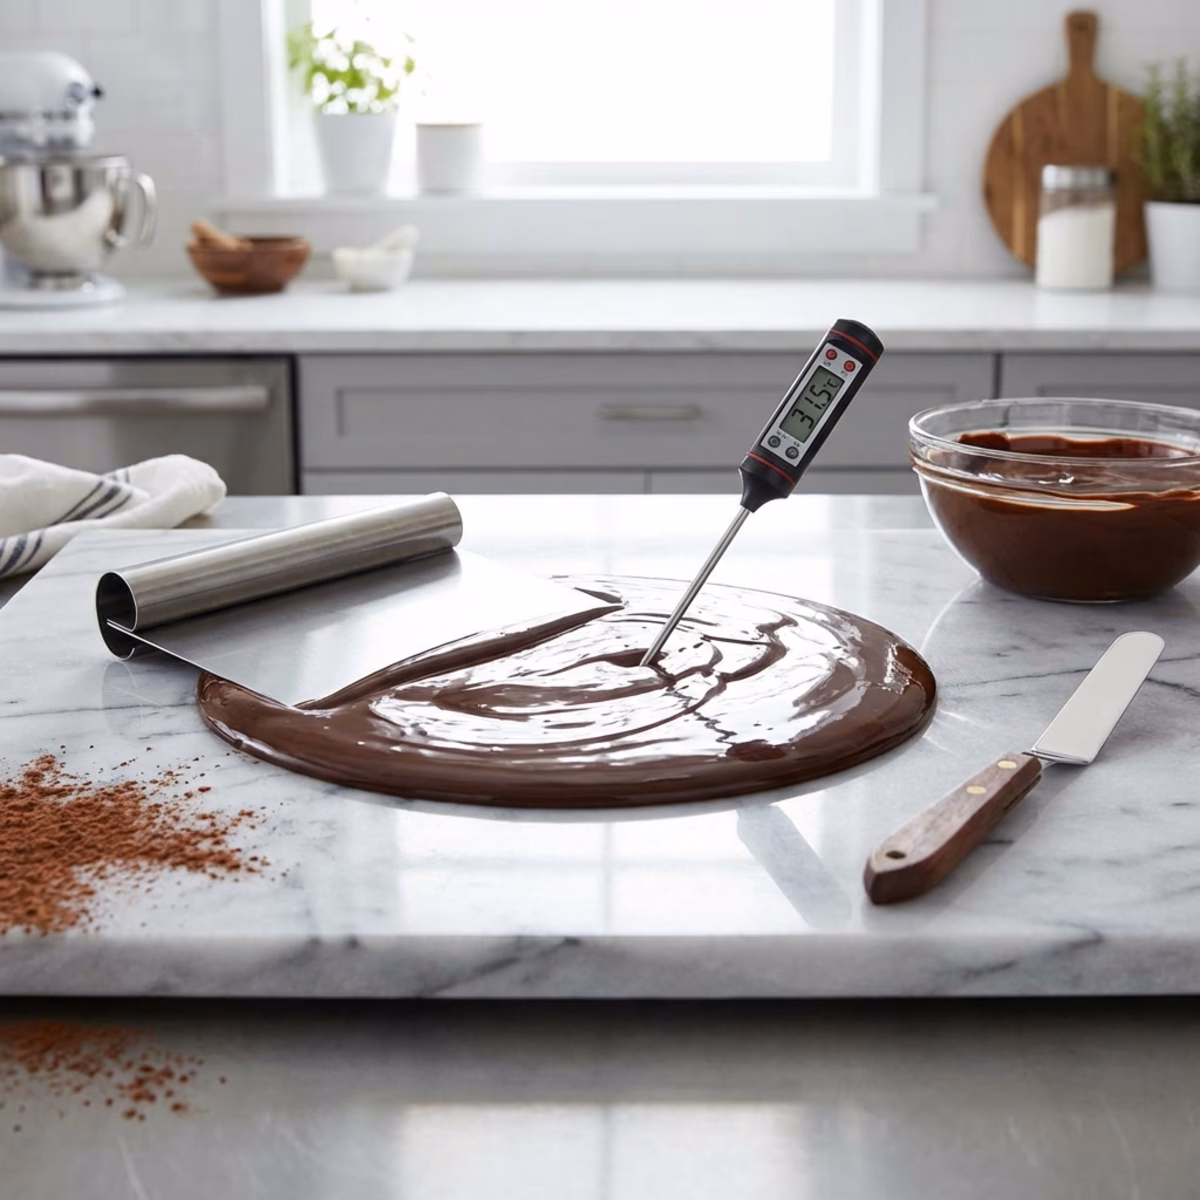
5) Do a temper test
Before you commit to dipping 40 strawberries or pouring an entire batch of bark, take 60 seconds to test your temper. Smear a thin stripe of chocolate onto a piece of parchment paper or the back of a metal spoon.
In a normal room-temperature environment, properly tempered chocolate should start setting within a minute or two, develop a glossy sheen as it firms up, and look smooth and even rather than streaky or wet. If your test stripe stays tacky for a long time or dries to a dull, matte finish, you’re likely out of temper and should go back to the cooling-and-seeding stage. Better to catch it now than after you’ve coated an entire tray of truffles.
Working with tempered chocolate (how to keep it in temper)
Here’s something that surprises a lot of beginners: getting chocolate into temper is only half the battle. Tempered chocolate is essentially a living material—it’s constantly trying to either cool down and over-crystallize or warm up and lose its temper entirely. Your job while working is to keep it in that Goldilocks zone.
Keep it warm, not hot
If the chocolate cools too much, it thickens and becomes difficult to work with. If it gets too warm, you lose the temper you worked so hard to achieve. A warm water bath (emphasis on warm, not hot) set underneath your bowl is the most reliable way to maintain temperature. You can also place a heating pad under a folded towel and set your bowl on top, or give the chocolate an occasional brief microwave pulse to keep things fluid. Whatever method you choose, check the temperature frequently.
Stir often
Don’t just let your chocolate sit there between dips or pours. Stirring redistributes the crystals throughout the chocolate and keeps the texture consistent from first dip to last. Think of it as keeping the chocolate “alive” and well-mixed. A quick stir every minute or so goes a long way.
Avoid cold bowls and cold add-ins
This is a sneaky gotcha that catches people off guard. If you toss cold nuts, freeze-dried fruit, or chilled fillings into your tempered chocolate, you can plummet the temperature and cause sudden thickening or even knock the chocolate out of temper entirely. Always bring your add-ins to room temperature before combining them with tempered chocolate. A few minutes on the counter is all it takes.
Common problems (and fixes)
Even experienced chocolate workers run into trouble sometimes. Here’s a field guide to the most common issues and how to get back on track.
Problem: Chocolate sets dull, streaky, or gray
This is the classic sign that your chocolate wasn’t in temper when it set. The most likely culprits are that the chocolate was never properly tempered to begin with, that it got overheated during the rewarming step and lost its crystal structure, or that you were working at too high a temperature. The fix is straightforward: melt the chocolate back up to full melt temperature to erase everything, and then re-temper from scratch. The chocolate itself is perfectly fine—it just needs another chance.
Problem: White film shows up days later (fat bloom)
Fat bloom is that dusty white coating that can appear on chocolate days or even weeks after you made it. It happens when cocoa butter migrates to the surface and recrystallizes in an unstable form. Common causes include poor temper during production, temperature swings during storage (think warm-cool-warm cycles), or storing chocolate near a heat source. The fix is to re-temper and then store your finished pieces in a stable, cool environment away from heat fluctuations.
Problem: Chocolate is thick and gloopy
If your chocolate has turned into something resembling pudding, the temperature has likely dropped too low, or you’ve over-seeded and created too many crystals. Some chocolate formulations—particularly chips and high-cocoa-solids varieties—are naturally thicker as well. To fix this, warm the chocolate very gently back into the working range, checking your thermometer constantly. If it’s still too thick even at the right temperature, you can stir in a small amount of melted cocoa butter to improve fluidity without compromising the temper.
Problem: Chocolate seizes (grainy paste)
Seized chocolate is the heartbreak scenario. It happens when water or steam gets into your melted chocolate, and it transforms almost instantly from smooth and glossy to a grainy, clumpy paste. For tempering and dipping purposes, seized chocolate is unfortunately not salvageable—the water has fundamentally changed the texture. However, all is not lost for your kitchen: you can rescue seized chocolate by whisking in hot cream or butter to create a perfectly lovely ganache or chocolate sauce. Different destination, still delicious.
Problem: Coating is too thick on dipped items
If your dipped strawberries or truffles are wearing thick, clunky chocolate coats instead of sleek thin shells, a few adjustments help. First, make sure your chocolate is warm enough—still within the temper range but toward the upper end, where it’s more fluid. After dipping, tap the item against the rim of the bowl or your hand to shake off excess chocolate, and give it a few extra seconds to drip before setting it down. Using a deeper, narrower container for dipping also helps because you can submerge items fully and lift them out cleanly in one smooth motion.
Tempering for specific projects
Different projects have different quirks. Here’s how to adapt your approach.
Dipped strawberries
Strawberries are a classic tempering project, but they come with one major hazard: moisture. Strawberries must be completely, thoroughly dry before they go anywhere near melted chocolate, because even a little surface water will cause seizing. Pat them dry with paper towels and let them sit at room temperature before dipping—cold fruit straight from the fridge will shock the chocolate and cause it to thicken and set too quickly, leaving you with a lumpy, uneven coat. When you’re ready, dip quickly and confidently, tap off the excess, and place each berry on parchment to set.
Bark
Bark is wonderfully forgiving and a fantastic first tempering project. The main thing to keep in mind is thickness: spread your tempered chocolate thin for a quicker set and a more satisfying snap when you break it into pieces. Add your toppings—nuts, dried fruit, sea salt, whatever calls to you—quickly after spreading, because tempered chocolate starts setting fast and you want everything to adhere properly.
Molds
Molded chocolates are where tempering truly earns its keep. A well-tempered chocolate will release from molds with a gorgeous shine and a clean pop that feels incredibly satisfying. Make sure your molds are spotlessly clean and completely dry before filling them. After pouring, tap the mold firmly on the counter a few times to release any trapped air bubbles. Let the chocolates set at cool room temperature rather than rushing them into the fridge—refrigerator condensation can mar the surface and cause bloom. Only use the fridge if your room is genuinely warm, and even then, remove the chocolates as soon as they’re set.
Storage: how to keep finished chocolate beautiful
You’ve done the hard work of tempering, dipping, and molding. Now don’t ruin it with bad storage. Tempered chocolate thrives in cool, stable temperatures with low humidity and no direct sunlight. A cupboard or pantry away from the stove is perfect. The enemies of beautiful chocolate are a hot windowsill that softens and re-melts the surface, and a refrigerator that cycles humidity and causes condensation.
If you live in a very hot climate and refrigeration is truly necessary, wrap your chocolate pieces tightly in plastic wrap or seal them in an airtight container before chilling. When you’re ready to serve, let the chocolate come back to room temperature while still wrapped—this prevents condensation from forming on the surface and ruining that gorgeous shine you worked so hard to achieve.
A practical “first temper” recipe
If you want a low-stakes, high-reward first project to practice your new skills, here’s what I’d suggest. Temper about 250–500g of dark chocolate using the seeding method described above. Do your temper test on parchment paper to make sure everything is dialed in. Then make a simple bark: spread the tempered chocolate onto a parchment-lined sheet in a thin, even layer, scatter some toasted nuts and flaky sea salt over the top, and let it set at room temperature until completely firm.
That’s it. You’ll learn the feel of tempered chocolate—how it moves, how it thickens, how it responds to temperature changes—without the pressure of fighting complicated molds or racing to dip a mountain of strawberries. And when you break that bark apart and hear that clean, satisfying snap? You’ll be hooked.
The takeaway
Tempering isn’t a mystery. It isn’t alchemy. It’s controlled crystallization, and it’s absolutely something you can master in your own kitchen with basic tools and a little practice.
If you remember just three things, you’ll do great. Keep everything bone-dry, because water is the one disaster you can’t easily undo. Use a thermometer and stay within the temperature ranges for your chocolate type, because guessing is how you end up with dull, bloomy results. And always do a quick temper test before committing to a big batch, because sixty seconds of checking can save you an hour of disappointment.
With those principles in your back pocket, you can make chocolate that looks professional, snaps cleanly, and stays gorgeous for days—all without needing a chocolatier’s kitchen. Now go melt something.